Avatar: Fire and Ash
Culinary Movie Night Guide
Difficulty Level: Medium

Table of Contents
Equipment
Here is a list (with links) of all the equipment and decorations I used for my Avatar: Fire and Ash Culinary Movie Night. I would be incredibly grateful if you used my links. I will make a little commission, and that would really help with the cost of the website and related expenses. You can find my full Amazon List here!
To decorate my house, I used a lot of old shipping boxes and materials and painted them neon. I hung jellyfish lights and decorated my entertainment center with a lot of leaves. I also had 4 black lights facing the TV, so everything was lit up as if we were on Pandora. Here are all the items I used for the decorations, as well as the dishes I served.
Entertainment Center Decorations:


Flight of the Medusoids

I Am Fire!

The Seed of Life
Fire and Ash
The Great Mother Provides
Tips
- Personalizing the Menu– When planning your menu for your movie night, don’t feel pressured to serve exactly what I chose to serve. Feel free to remove/add/replace dishes so it makes sense for you and your guests. I’ve included an editable menu in this guide to make it your own!
- Managing Your Time– These movie nights can take a lot of time to prepare, especially if you plan on doing everything yourself. If you are planning a culinary movie night with a group, I suggest doing a potluck style. Have each person contribute a dish or two, and it’ll be very manageable. If you are planning on preparing everything yourself, here are some things I’ve learned while doing these often:
- Make A To-Do List– I can’t stress this enough! It’s very easy to forget simple things like opening a bottle of prosecco before you start the movie so you aren’t fumbling with the seal before serving. I have done this so many times! Your to-do list should include absolutely everything you need to do leading up to pressing play.
- Start Early– I learned this after a few very long days of trying to cook, prepare, and host all on the same day. Anything that can be done in advance should be done during the days leading up to the movie night. Some examples include pre-mixing cocktails, making desserts and other foods like soup that hold up well in the refrigerator, and pre-making any handmade decorations. Hosting is stressful enough without having to make a multi-course meal in one day, so get as much done as possible before.
- No Pausing– The question I get asked the most is “Do you pause the movie to bring out the next dish?”. It’s important to me that I don’t disrupt the flow of the movie, so I do not pause. It’s also important to me to enjoy the movie with my guests. Setting up everything I need before the movie helps me bring out each dish efficiently. The setup usually includes plating each dish and storing it in the refrigerator, so all I have to do is quickly microwave it before serving. I set out any garnish or decoration on my kitchen counter so it’s easily accessible. I even pour the cocktails into their cups and store them in the refrigerator, so all I have to do is add ice and any finishing touches before serving. Always think about how you can do the bare minimum during the film. I always include the setup in my to-do list as well, so I don’t forget about any aspect of the preparation.
- Optional– If your budget permits, I recommend ordering food that you may not be confident in cooking or food that may take a lot of time to cook. I do this occasionally, and it helps cut down the preparation time and supports local businesses. Win Win!
- Decorations- Have fun and decorate your space and serving tray! Add elements from the theme of the movie, but make a budget and stick to it! I usually use things I already own because these movie nights are DIY, and I don’t need to spend a fortune to make it fun. If I do buy decorations for the movie night, I try to find cheap or reusable things. If you are curious about some of the things I’ve used during the movie nights, here is a link to my Amazon List. All these items are things I bought with my own money and enjoyed using.
- Manage Stress- Culinary Movie Nights are fun and a great way to show your friends and family you love them. Sometimes, things you envision in your head will not come out perfectly. When this happens to me, it can be discouraging and stressful, but the people I do these for have NEVER expressed anything but appreciation. Go easy on yourself and remember that your guests are just happy to be there and to experience something you put so much thought and time into making.
Menu
I have created a free, editable, and printable menu for all the dishes I served for this Culinary Movie Night! Feel free to change it to what will work for you and your guests.
Cues
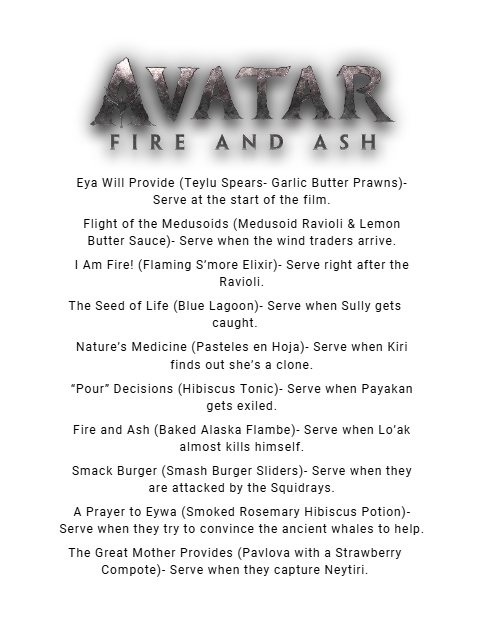
These are the cues I used during the movie night so I knew when I had to get the next dish ready to serve.
Please note: Each cue describes a scene that happens a few minutes before I have to serve the dish. It does not describe the scene the dish is based on. Some people get confused with that, so I thought I should specify. Because the cues only give you a few minutes to prepare the dish, it’s very important to have everything cooked and set up before the film starts. Review the “Tips” section above for ways to make this seamless.
I often get asked why I don’t use time stamps to keep track of when to serve the next dish and the simple answer is, I don’t find those helpful. If I used timestamps, I would have to have a separate timer going or keep disrupting the movie to check the timestamp. It makes much more sense to have cues to indicate when the next scene is about to happen. This allows me to enjoy watching the film with my guests.
Below is the link to the cues I used. This document is editable, so you can make updates if you decide to take out or change dishes.
Recipes
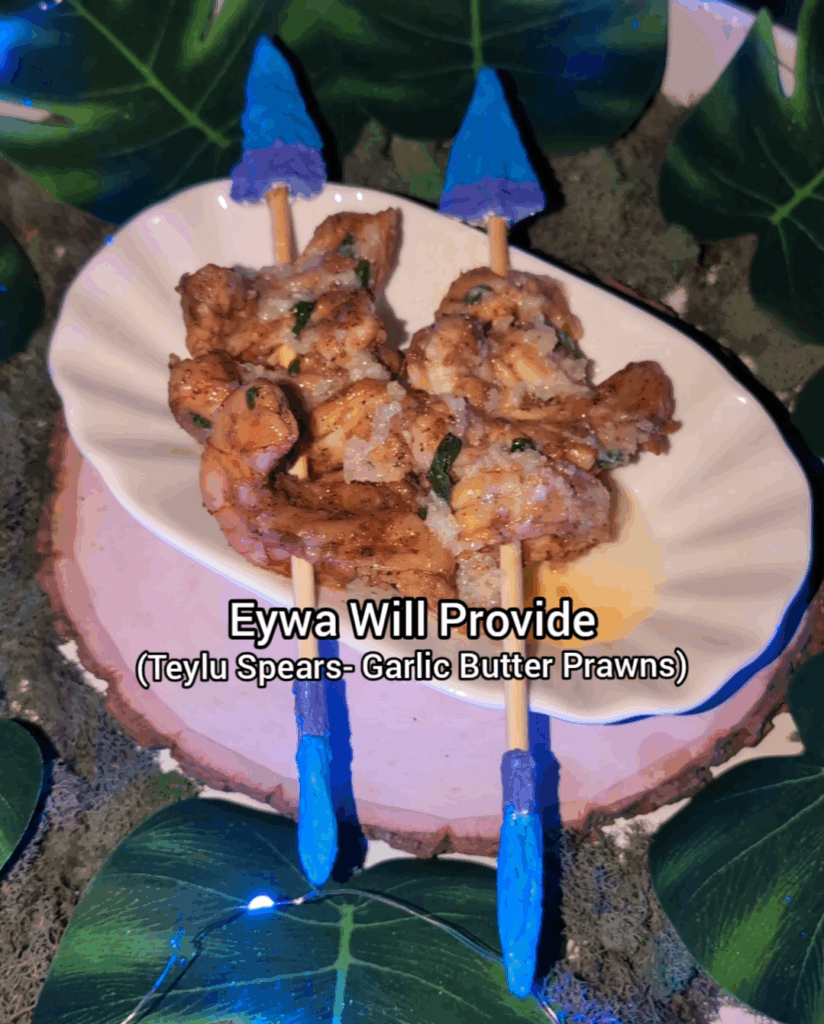
Eywa Will Provide
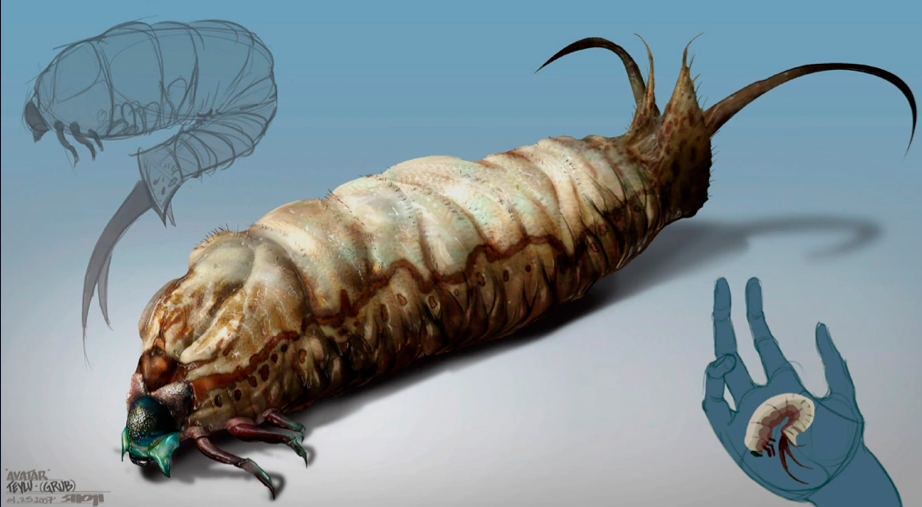
Teylu is an insect-like creature that looks like a grub or, in this case, a prawn. It’s part of the Na’vi’s diet, so I wanted to serve it on a “spear” to resemble the internal argument amongst the Na’vi: Do we use metal weapons (guns) or their native weapons, spears?
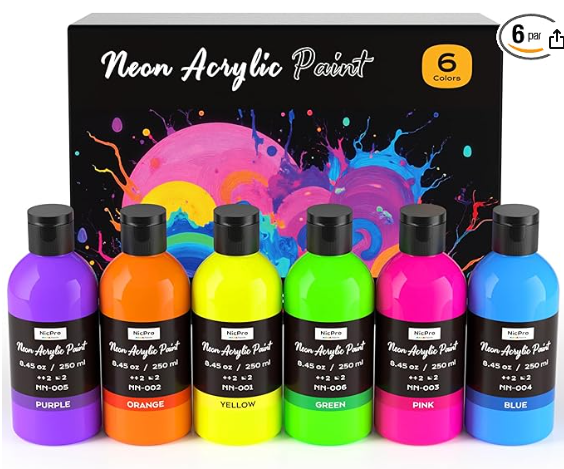
To make the spears, I used aluminum foil and shaped it around both ends of a wooden kabab stick. When I was happy with the shape, I slipped the aluminum foil off the stick and painted it using this Neon Paint. You may need to do a few counts for it to be fully covered. Make sure to get this done the day before, so it’s fully dry before movie night.
Because this is the first dish of the movie night, I recommend making it fresh, right before starting the movie. Slide your freshly made prawns onto the kebab stick and then slip back on the painted aluminum foil.
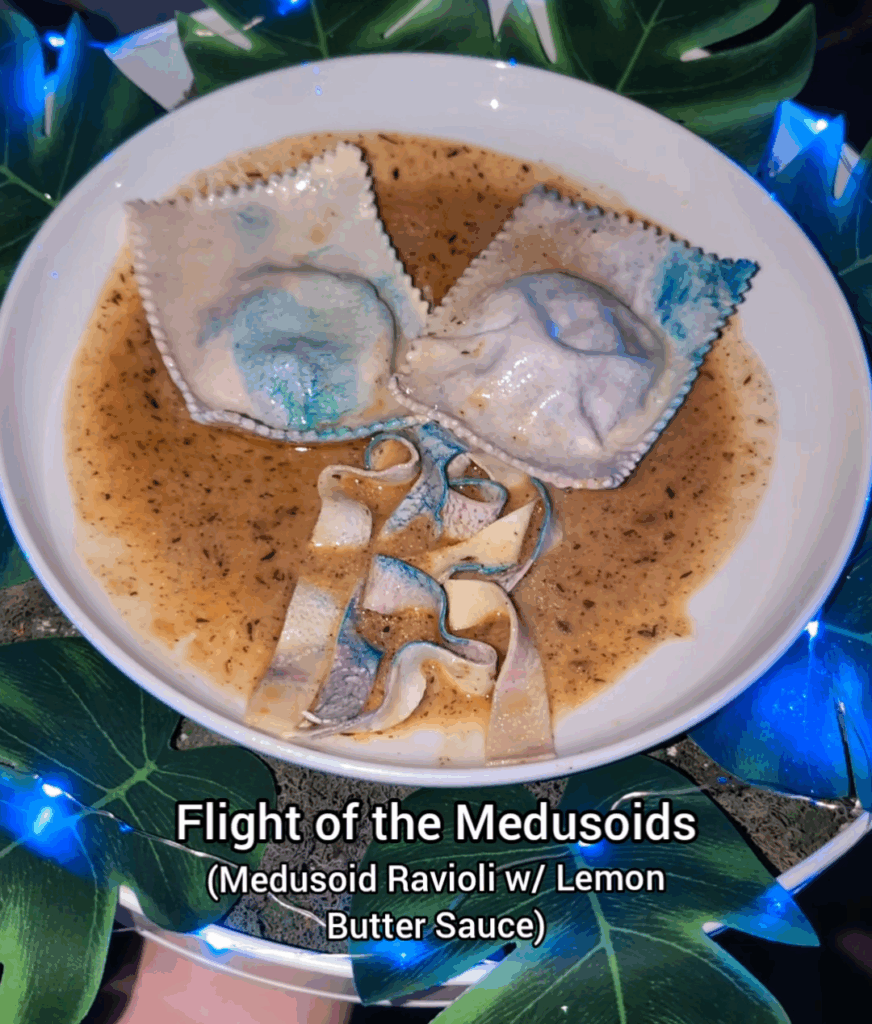
Flight of the Medusoids

For this scene, I was inspired by the beautiful colors of the flying Medusoids. They are marbled with purple and blue shades and have stringy ropes hanging that remind me of pasta. I thought it would be cool to serve jumbo ravioli and pasta that resemble one of these majestic flying creatures.
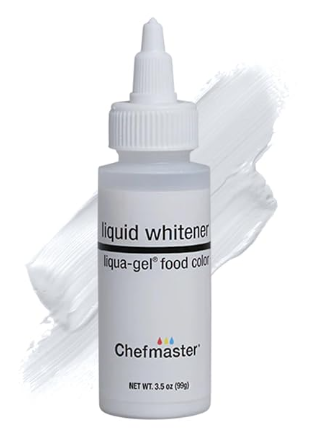
Ravioli Recipe– This is a simple ravioli recipe, but you will need to add food coloring to make the marbled effect. I used purple, blue, pink, and this Liquid Whitener to make the cool pattern.
To add the colors, I added a drop or two of each color and rolled out the dough. This is a very hard workout because the dough is tough and needs to be very thin. If you have a manual pasta roller, I recommend using that over a rolling pin.
Fold your dough, add more drops, and keep rolling it out until you get the desired look. I recommend making jumbo-sized ravioli. This is the ravioli cutter I used.
Using my pasta scraps, I cut out some thick fettuccine pasta to use as the stringy bits of the Medusoids. Make sure to boil your pasta carefully so it stays intact. It should only take a few minutes until the pasta starts floating and it’s fully cooked.
I recommend making the ravioli, pasta, and sauce ahead of time and storing them in your refrigerator. You can even make them the day before. Then, when you are setting up your dishes before starting the movie, plate the Medusoid ravioli and store the plate in the refrigerator. When you get to your cue to serve, microwave the plate for about a minute and serve.
I Am Fire!

How to safely set a drink on fire. This video is very informative if this is your first time setting a drink on fire. It can be nerve-wracking, but it is very easy if you take precautions and are careful.
Always make sure you have a fire extinguisher or fire blanket on hand to put out any fires that become uncontained. I have never had to use it, luckily, but you should always play it safe.
You will need alcohol that is high proof. I used a 110-proof rum for this drink. With your drink and garnish already in the glass, use a spoon to gently pour a small amount of the high-proof alcohol on top of the drink. The spoon allows for you to guide the alcohol so it stays sitting on top. Immediately after pouring the alcohol, use a lighter to light it on fire. The drink will burn for about a minute or so depending on how much alcohol you added. Let it burn out. You can always replace the marshmallow garnish if they get too burnt.
I recommend having the drink premixed and the marshmallow garnish already on the cocktail pick so you can quickly serve this drink while the movie is playing.

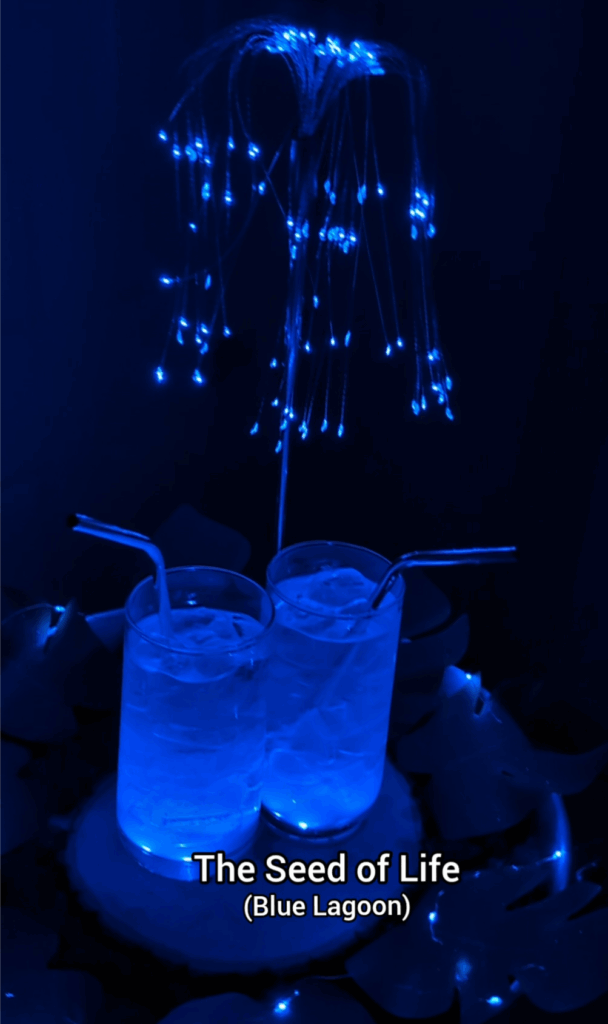
The Seed of Life
Blue Lagoon Recipe
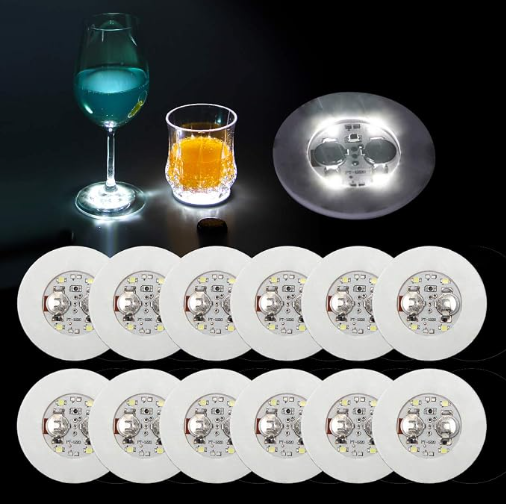
To make the drinks glow blue, I used these coasters that light up in different colors. Keep pressing the button until it gets to your desired color.
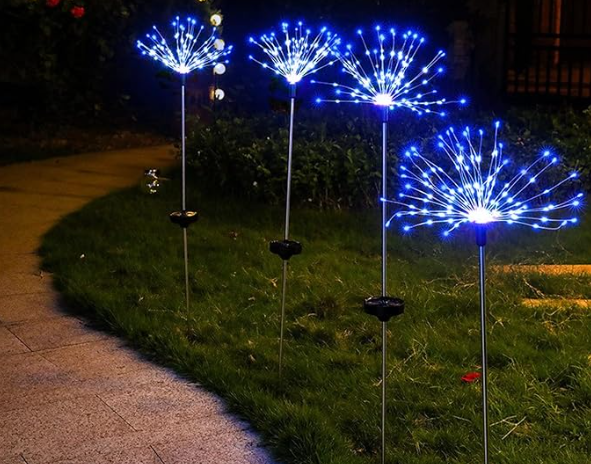
For the seed of life, I used these firework lights. They are made of bending wires, so I bent them to match the shape of the seed of life. These lights are motion-sensored, so place something on top of the sensor to keep them lit the whole movie.
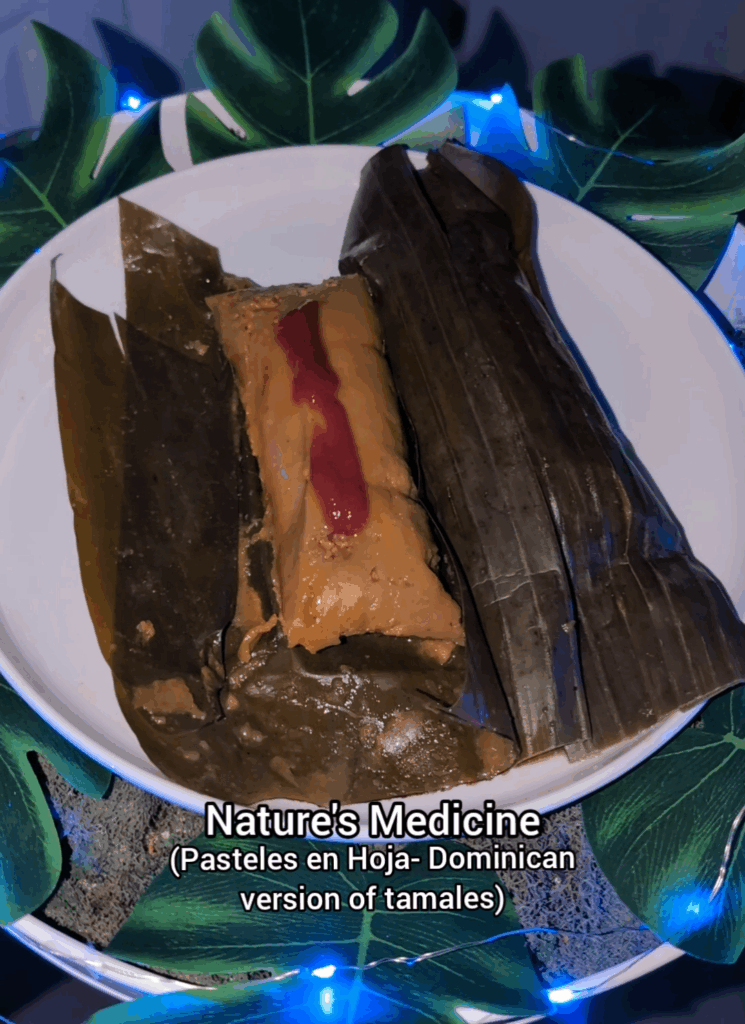
Nature’s Medicine
For this scene, I immediately thought of Pasteles en Hoja. These are very similar to tamales in concept but are based of plantains instead of masa. The green plantain leaves, I thought, were fitting to match the green leaf Ronal spread the healing herbs on.
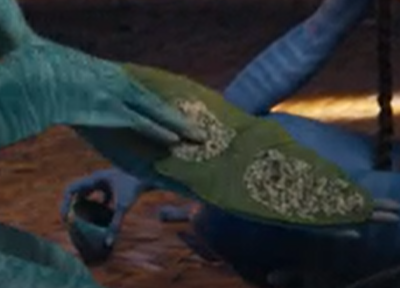
I bought these Pasteles en Hojas from a local Dominican bakery to save time, but here is a recipe you can follow if you want to make everything fresh.
To serve, just microwave for about a minute to reheat, and you can spread hot sauce or ketchup on top.
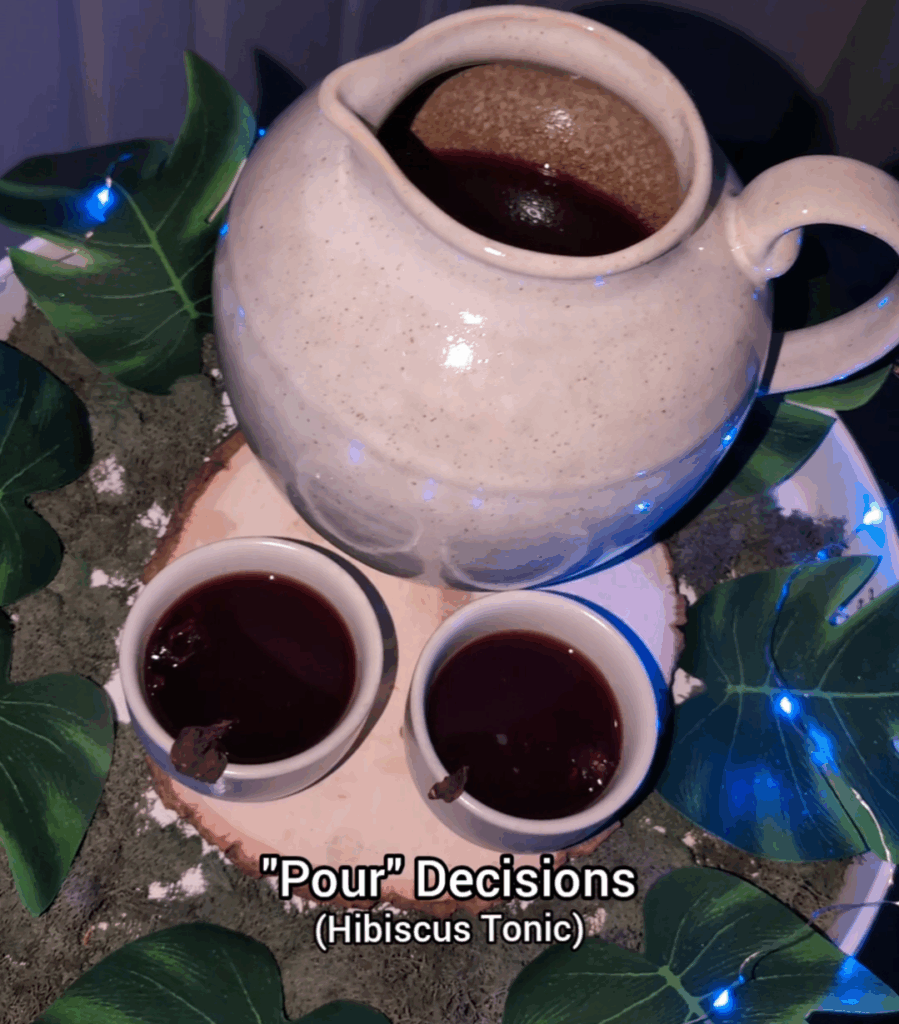
“Pour” Decisions
For this scene, I served my PERFECTED Hibiscus Sangria Recipe. Yes, I will brag because it’s that good!

Ingredients:
Orange Zest from one orange
Orange juice freshly squeezed from one orange
1/4 cup of sugar
1/4 cup of water
1/4 cup of dried hibiscus flowers
1/2 cup of Caribbean rum (my favorite is Ron Barceló Imperial)
750 ml bottle of red wine (Something dry is best since we’re adding sweetness)
Instructions:
- First, make the hibiscus syrup. Zest and juice an entire orange and add the zest and juice to a small saucepot. Then add the water, sugar, and hibiscus flowers.
- Bring the pot to medium heat, stirring often. Once the sugar is completely dissolved (takes about 5-10 minutes), remove the pot from the heat and let the flowers steep while the syrup cools.
- While the syrup cools, add the rum and bottle of wine to a pitcher and stir.
- When the syrup is completely cooled, strain it through a fine mesh strainer to remove any chunks from the syrup. Then add the smooth syrup to the pitcher. Stir so everything is combined.
- To serve, you can add fruit and ice, or serve it just as liquid.
- Note: I used the same hibiscus syrup for the Smoked Rosemary drink from “A Prayer to Eywa”. If you plan on making that drink too, set aside two ounces. Two ounces will make two drinks.
I recommend making this sangria the day before and storing it in your refrigerator. This will save you time on movie night, and it’ll make it quick to serve, so you don’t miss too much of the movie.
Fire and Ash
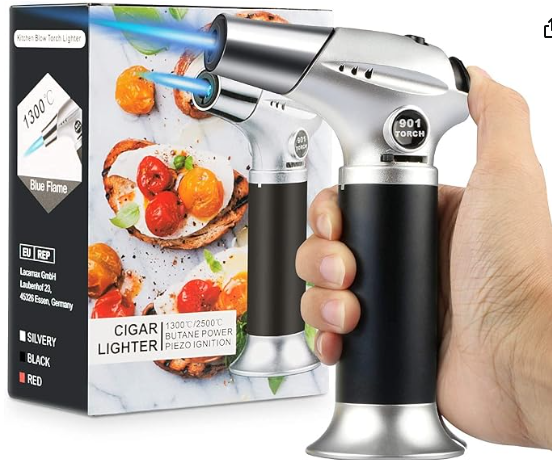
For this scene, I really wanted to set something on fire. LOL! I decided to serve a Baked Alaska flambe. A Baked Alaska is a dessert with a cake base, ice cream on top, and covered in meringue. To set it on fire, you drizzle high-proof alcohol on top and then set it on fire using a kitchen torch. There are other ways to set it on fire, but I find this the easiest for beginners.
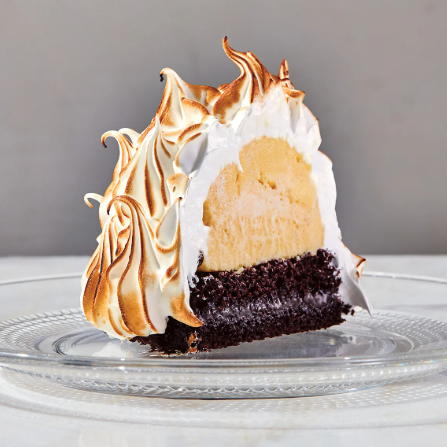
I made a small version of this dessert using a small bowl. The size of the bowl you use will determine the size of the flambe. Line the bowl with plastic wrap and start by filling half of it with your choice of ice cream.
Fill the rest of the bowl with cake. If you don’t have a slice of cake that perfectly fits the bowl, that’s okay. You can crumble it up and gently press it into the bowl until it’s filled to the top and compact.
Wrap up the top of the bowl with plastic wrap and free over night. The next day, gently wiggle the cake and ice cream out of the bowl and peel the plastic wrap off. Plate it, cake side down, on a plate that is big enough to add Varang’s head piece. Make sure the plate can also withstand fire, so no paper or plastic!
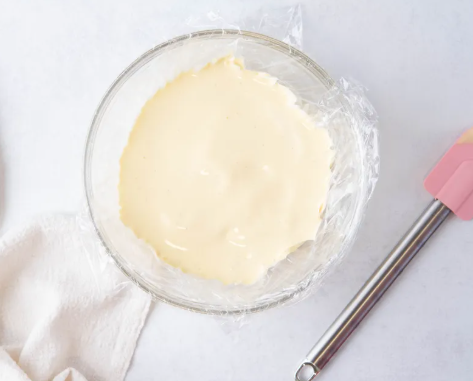
I made the meringue first thing in the morning of movie night, so it had time to freeze completely. I have tried multiple meringue recipes, and only one has proven to work every single time. This is the recipe I stand by.
I also served a pavlova cake for the last dessert of the movie night, and I used the same recipe. To make my life easier, I used half of the recipe to coat the top of the Baked Alaska and half of the recipe to make the pavlova cake.
Once you make the meringue, use a spoon to coat the ice cream cake. Use the bottom of the spoon to add swooping peaks. When you are happy with the look, plate the plate in your freezer so it can freeze for a few hours. After a few hours, take the plate out of the freezer and, with a kitchen torch, crisp up the meringue to add a warm brown color to it. Place the plate back in the freezer so it can fully freeze before you start the movie.
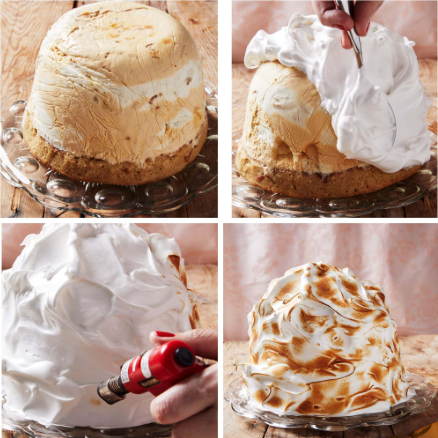
To make the Varang headpiece, I used black (dark chocolate works too) and red melting chocolate. You can find these colors at your local craft store in the baking section. To make the feather shape, first place parchment paper on a baking sheet. This will make it easy to remove the chocolate once it’s hardened.
Melt your chocolate using the melting instructions on the packaging. Scoop a tablespoon of the melted chocolate and place it on the parchment-lined baking sheet. With the back of a spoon, swoop the chocolate out to form a feather shape. Continue creating these shapes with the red and black chocolate.
Place the baking sheet in your freezer for about 10 minutes so the chocolate can harden completely. When it’s hardened, gently pop the chocolate feather off the parchment paper and start arranging them on the baked Alaska plate. Varange has mostly red feathers on both sides, with less black on top. (see below)
When you are happy with the design, place your plate bake in your freezer an dlet it stay there until you are ready to serve it during the movie.

When it’s time to serve and set on fire, you will need a shot glass of high-proof alcohol (I used 110 proof rum) and a kitchen torch. When you are ready to set it on fire, pour your high-proof on top of the baked Alaska and light it on fire with the kitchen torch. Make sure you have a fire blanket or fire extinguisher with you in case of an accident. As long as you are careful, there shouldn’t be an issue; the fire will stay contained to where you pour the high-proof. But it’s better to be safe.

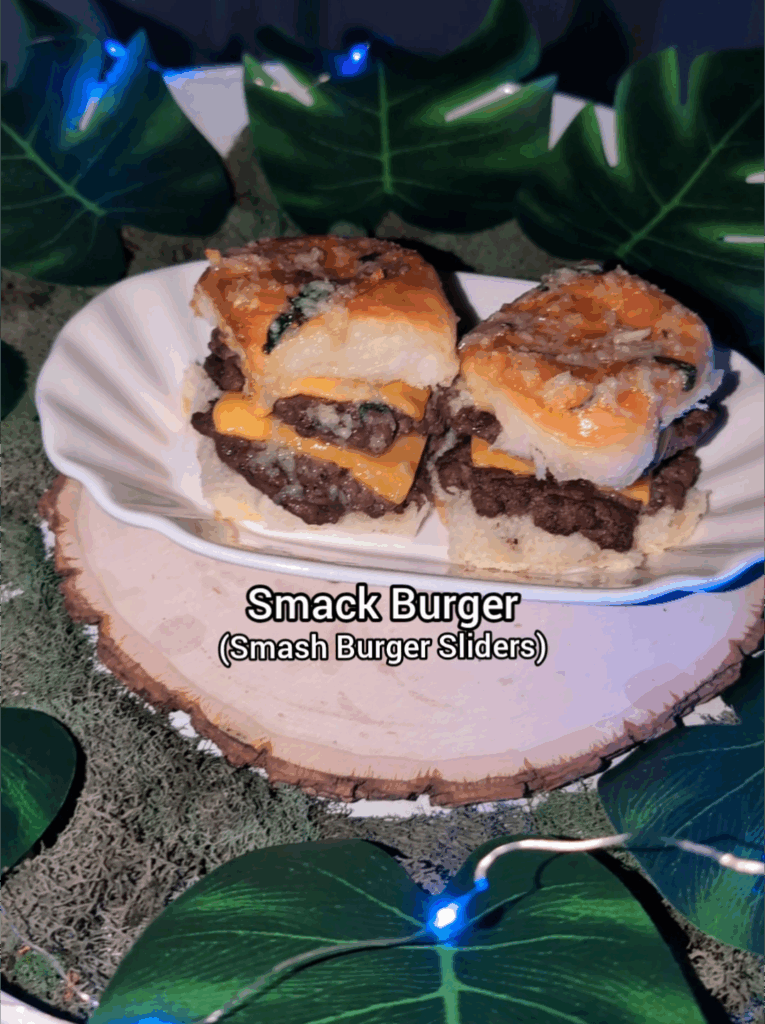
Smack Burger
For this silly scene where Spider smacks the burger Miles offers him, I served smash burger sliders. For the bun, I used Hawaiian rolls, and for the burger, I did a simple double smash burger seasoned with salt, pepper, and garlic powder. I topped each patty with American cheese and served them with ketchup, mayo, mustard, and a dill pickle slice. On top of the rolls, I brushed garlic butter on top.
To prep these burgers so I could serve them fast, I made the patty ahead of time and stored them in my refrigerator. When I was about to start the movie, I assembled the double cheeseburgers and stored them in my oven on the lowest heat setting. This acted as a warmer, and it slowly brought the sliders to temperature, so when it was time to serve, they were perfectly ready to eat.
When it was time to serve during the movie, I took them out of the oven and topped them with condiments and brushed the melted garlic butter on top before serving.
To make the garlic butter, I minced one garlic clove and added it to a tablespoon of salted butter and a pinch of fresh chopped parsley. I had this prepped before the movie and then microwaved it in a bowl for a few seconds before brushing it on the burgers.
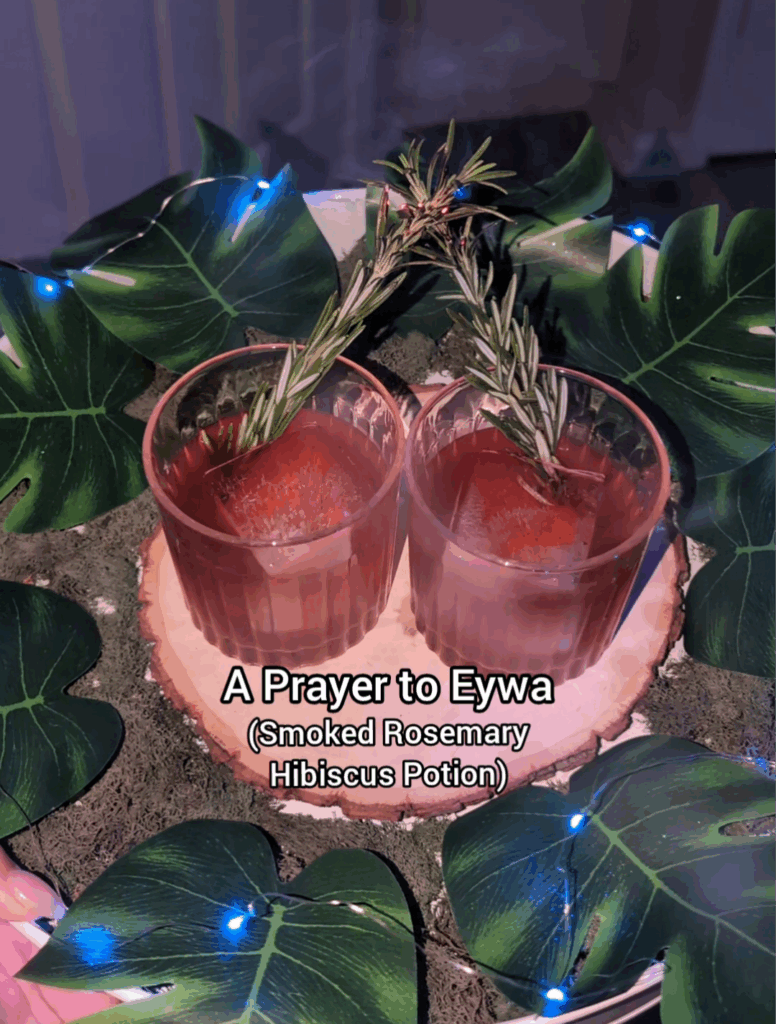
A Prayer to Eywa
For this scene, I wanted to bring to life the smoke that Ronal and Kiri were praying over. I served a Smocked Rosemary Hibiscus Old Fashioned that filled our home with the most delicious smoky scent. It was very immersive.

To make this old-fashioned, you’ll need the following:
2 oz of Bourbon or Rye Whiskey
1 oz of hibiscus syrup (see below)
2-3 dashes of Angostura bitters
1 large Ice Cube
1 Rosemary Spring
Note: If you made the Hibiscus Sangria from “Pour Decisions”, you should have reserved 2 ounces of that hibiscus syrup to make these old fashions. If you do not have that reserved, here is the recipe.
Hibiscus Syrup Recipe
Orange Zest from one orange
Orange juice freshly squeezed from one orange
1/4 cup of sugar
1/4 cup of water
1/4 cup of dried hibiscus flowers
Instructions:
- Zest and juice an entire orange and add the zest and juice to a small saucepot. Then add the water, sugar, and hibiscus flowers.
- Bring the pot to medium heat, stirring often. Once the sugar is completely dissolved (takes about 5-10 minutes), remove the pot from the heat and let the flowers steep while the syrup cools.
- When the syrup is completely cooled, strain it through a fine mesh strainer to remove any chunks from the syrup.
I recommend premixing this drink and storing it in your refrigerator. That way, you can quickly serve it during movie night without having to take time to measure out ingredients.
To serve, add your ice cube to your glasses, pour the premixed drink, and add the rosemary sprigs to your glasses. Light the tops of the rosemary sprigs on fire and then blow the fire out. What you are left with is the rosemary smoldering and slowly smoking. It smells amazing!
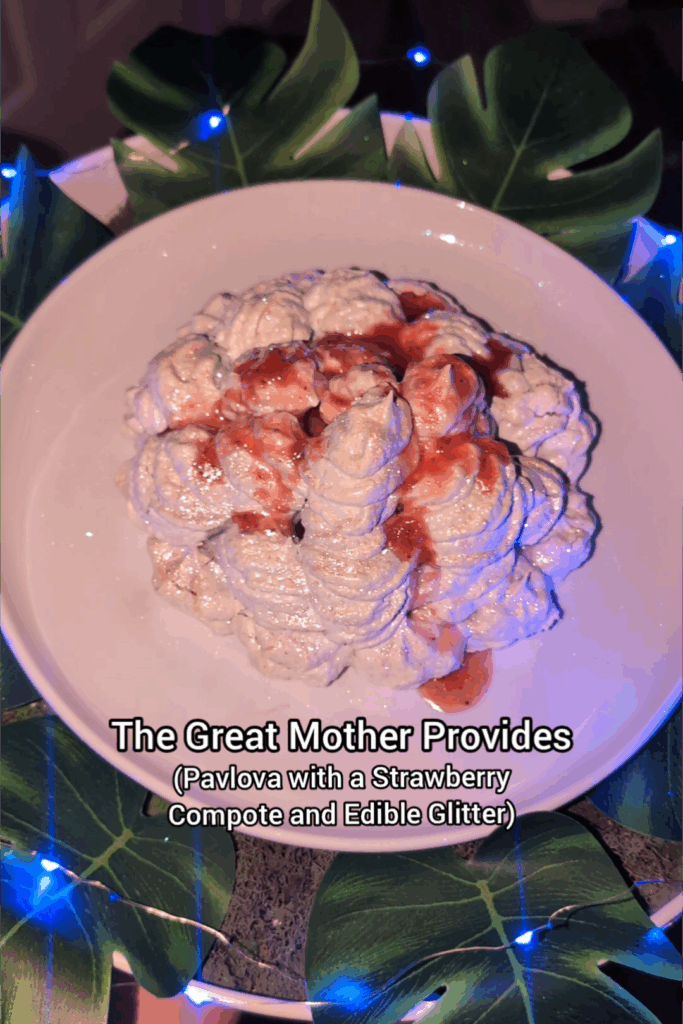
The Great Mother Provides
For this last dish, I envisioned a sparkling Pavlova cake to symbolize the underwater tree of life that comes to life when their prayers are finally answered.
Here is the recipe I used for the Pavlova Cake. I used half of the meringue from this recipe for this cake and half to cover the Baked Alaska from the “Fire and Ash” dish above.
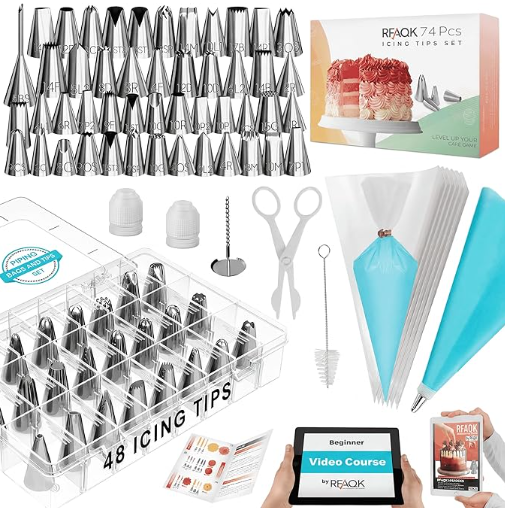
This recipe is for a smashed pavlova, so the design of this Tree of Life cake will be different, but the actual recipe for the meringue and the cooking process is the same. Once you make your meringue, add it to a piping bag with a decorative tip, and pipe the cake. I piped the bottom layer and then continued up until it peaked.
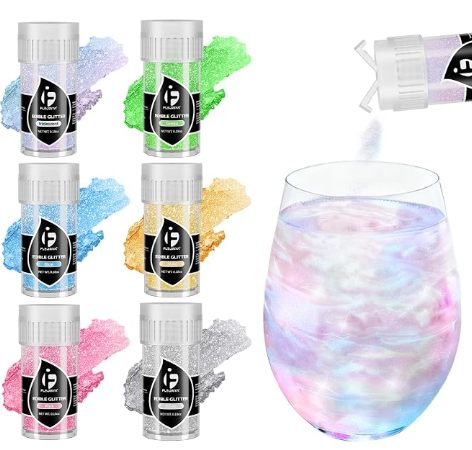
Bake as instructed in the recipe. Once it’s done, and you’ve left it in the oven for the required time, take the cake out and very gently move it to your serving plate. Top the cake with edible glitter.
While the cake is baking, you can make your strawberry compote. I recommend not adding the strawberry compote on top of the cake until you are about to serve the cake at the end of the movie. This way it doesn’t get soggy.