Encanto
Culinary Movie Night Guide
Difficulty Level: Medium-Hard


Table of Contents
Equipment
Here is a list (with links) of all the equipment and decorations I used for my Encanto Culinary Movie Night. I would be incredibly grateful if you used my links. I will make a little commission, and that would really help with the cost of the website and related expenses. You can find my full Amazon List here!
Luisa’s Relaxation Libation
Bruno’s Vision
Ajiaco Colombiano
- Traditional Colombian Clay Pot
- Alternative Pot (I used in the video)
Cactus Makes Perfect
The Miracle is You
For the serving tray, I decorated it with pink flowers, green moss, and a wooden log. All were bought from Michaels Craft Store.
Tips
- Personalizing the Menu– When planning your menu for your movie night, don’t feel pressured to serve exactly what I chose to serve. Feel free to remove/add/replace dishes so it makes sense for you and your guests. I’ve included an editable menu in this guide to make it your own!
- Managing Your Time– These movie nights can take a lot of time to prepare, especially if you plan on doing everything yourself. If you are planning a culinary movie night with a group, I suggest doing a potluck style. Have each person contribute a dish or two, and it’ll be very manageable. If you are planning on preparing everything yourself, here are some things I’ve learned while doing these often:
- Make A To-Do List– I can’t stress this enough! It’s very easy to forget simple things like opening a bottle of prosecco before you start the movie so you aren’t fumbling with the seal before serving. I have done this so many times! Your to-do list should include absolutely everything you need to do leading up to pressing play.
- Start Early– I learned this after a few very long days of trying to cook, prepare, and host all on the same day. Anything that can be done in advance should be done during the days leading up to the movie night. Some examples include pre-mixing cocktails, making desserts and other foods like soup that hold up well in the refrigerator, and pre-making any handmade decorations. Hosting is stressful enough without having to make a multi-course meal in one day, so get as much done as possible before.
- No Pausing– The question I get asked the most is “Do you pause the movie to bring out the next dish?”. It’s important to me that I don’t disrupt the flow of the movie, so I do not pause. It’s also important to me to enjoy the movie with my guests. Setting up everything I need before the movie helps me bring out each dish efficiently. The setup usually includes plating each dish and storing it in the refrigerator, so all I have to do is quickly microwave it before serving. I set out any garnish or decoration on my kitchen counter so it’s easily accessible. I even pour the cocktails into their cups and store them in the refrigerator, so all I have to do is add ice and any finishing touches before serving. Always think about how you can do the bare minimum during the film. I always include the setup in my to-do list as well, so I don’t forget about any aspect of the preparation.
- Optional– If your budget permits, I recommend ordering food that you may not be confident in cooking or food that may take a lot of time to cook. I do this occasionally, and it helps cut down the preparation time and supports local businesses. Win Win!
- Decorations- Have fun and decorate your space and serving tray! Add elements from the theme of the movie, but make a budget and stick to it! I usually use things I already own because these movie nights are DIY, and I don’t need to spend a fortune to make it fun. If I do buy decorations for the movie night, I try to find cheap or reusable things. If you are curious about some of the things I’ve used during the movie nights, here is a link to my Amazon List. All these items are things I bought with my own money and enjoyed using.
- Manage Stress- Culinary Movie Nights are fun and a great way to show your friends and family you love them. Sometimes, things you envision in your head will not come out perfectly. When this happens to me, it can be discouraging and stressful, but the people I do these for have NEVER expressed anything but appreciation. Go easy on yourself and remember that your guests are just happy to be there and to experience something you put so much thought and time into making.
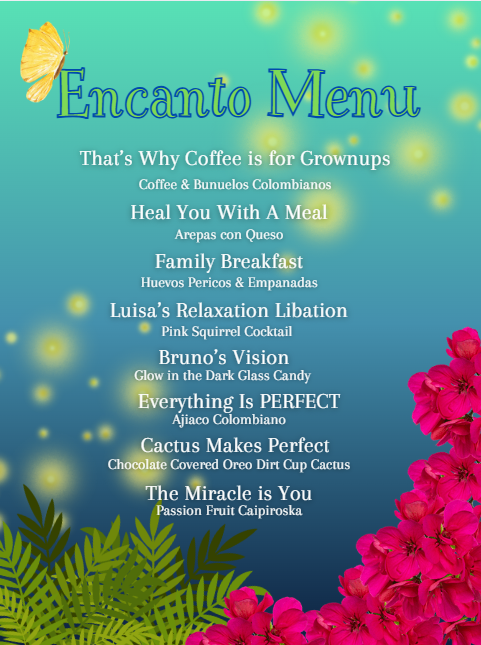
Menu
I have created a free, editable, and printable menu for all the dishes I served for this Culinary Movie Night! Feel free to change it to what will work for you and your guests.
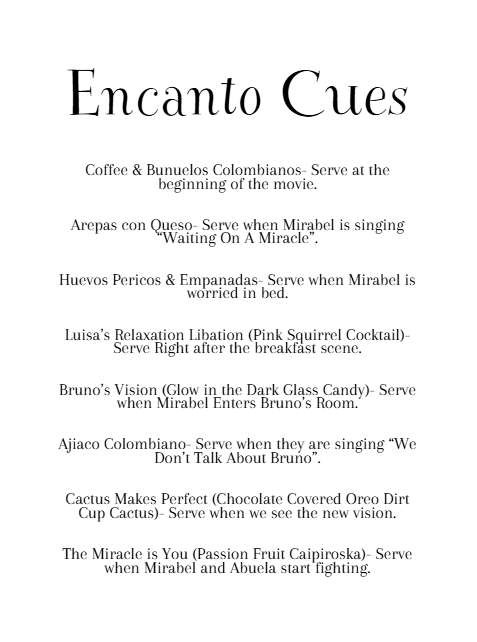
Cues
These are the cues I used during the movie night so I knew when I had to get the next dish ready to serve.
Please note: Each cue describes a scene that happens a few minutes before I have to serve the dish. It does not describe the scene the dish is based on. Some people get confused with that, so I thought I should specify. Because the cues only give you a few minutes to prepare the dish, it’s very important to have everything cooked and set up before the film starts. Review the “Tips” section above for ways to make this seamless.
I often get asked why I don’t use time stamps to keep track of when to serve the next dish and the simple answer is, I don’t find those helpful. If I used timestamps, I would have to have a separate timer going or keep disrupting the movie to check the timestamp. It makes much more sense to have cues to indicate when the next scene is about to happen. This allows me to enjoy watching the film with my guests.
Below is the link to the cues I used. This document is editable, so you can make updates if you decide to take out or change dishes.
Recipes
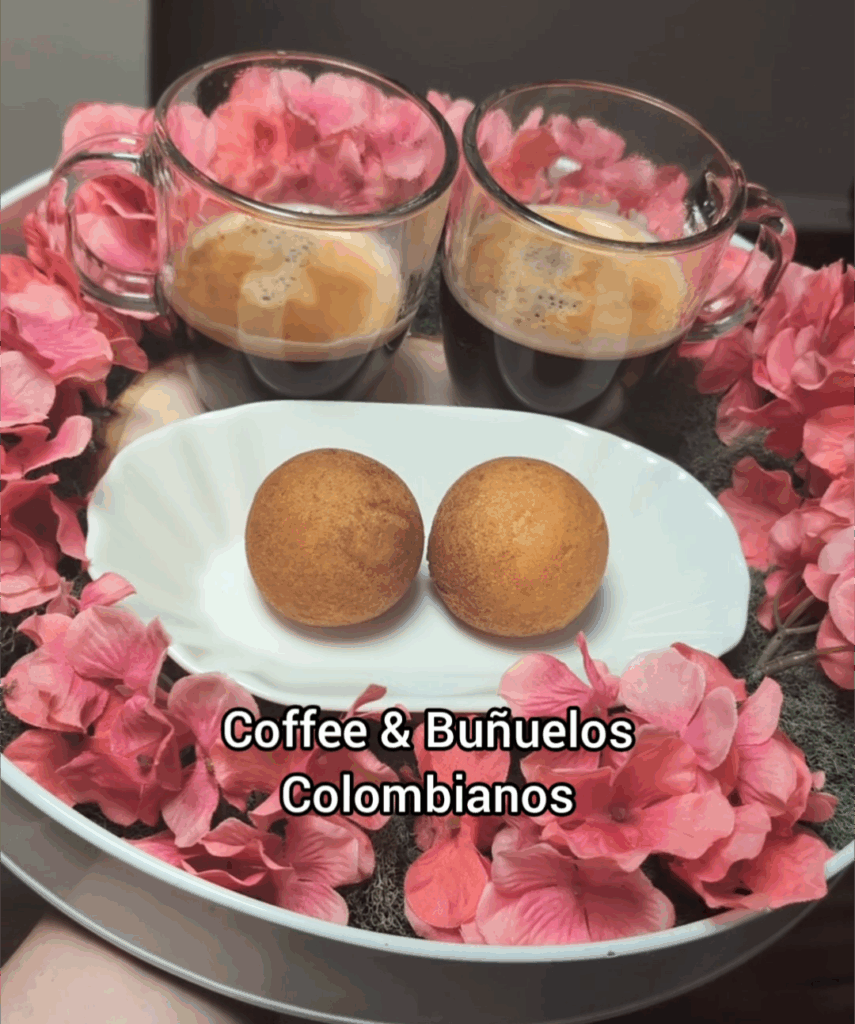
Coffee & Bunuelos
This is the first dish served for the Encanto movie night, so I suggest making the coffee right before you’re about to start the movie. You can serve decaf if you’re worried about having caffeine at night or with cocktails. This movie night features a lot of liquids. I probably wouldn’t serve coffee again if I did this over, but it’s a cute scene, so I included it. Use your best judgment on whether you want to serve coffee in any form or not.
For the Bunuelos Colombianos, I bought the ones I served from a Colombian bakery near my house. I’m lucky enough to live in South Florida (at the time of filming this movie night), so I wanted to get authentic Colombian pastries. If you don’t have access to a Colombian Bakery, here is a recipe you can use to make them at home.
Please note: I rated this movie night medium-hard difficulty because making some of the dishes I bought will increase the amount of work you have to do to prepare.
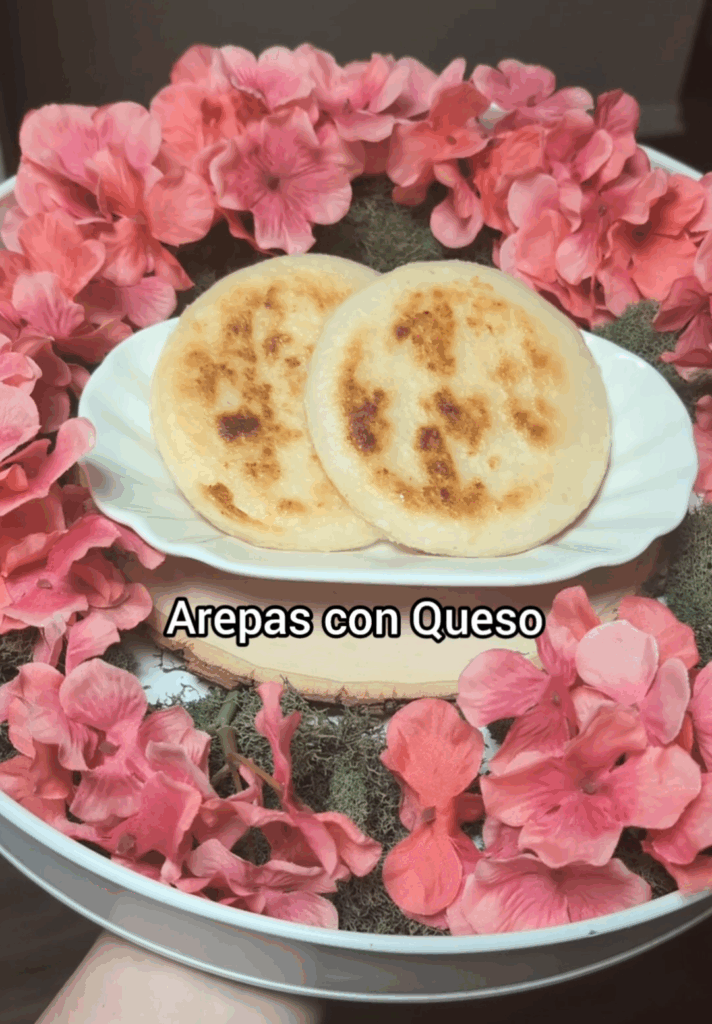
Arepas con Queso
If there is one dish you need to serve during Encanto Movie Night, it’s this one!
I’m lucky enough to live in South Florida (at the time of filming this movie night), so I wanted to get authentic Arepas with cheese instead of making them. I purchased these from my local Latin American grocery store. They are located in the refrigerated section by the cheese and they are premade. All you have to do when you get home is add some oil to a pan and fry them evenly on both sides until the cheese is all melty.
If you do not have access to a Latin American grocery store or bakery that serves them already cooked, here is a recipe you can follow to make them from home.
If you are going to make them from home, I suggest you prepare them earlier in the day, but don’t fry them until right before you start the movie. That way, they are fresh and ready to serve with the scene.
Because mine were already premade, I just fried them right before starting and wrapped them in aluminum foil so they stayed warm.
Huevos Pericos & Empanadas
Huevos Pericos is a traditional Colombian breakfast (also enjoyed in other countries), consisting of scrambled eggs, tomatoes, and green onions. It’s a simple dish but very delicious! I served it with avocado, which is commonly eaten with most meals in Latin American countries.
For the empanadas, I purchased them from a Colombian Bakery. I’m lucky enough to live in South Florida (at the time of filming this movie night), so I wanted to get authentic Colombian pastries. If you don’t have access to a Colombian Bakery, here is a recipe you can use to make them at home.
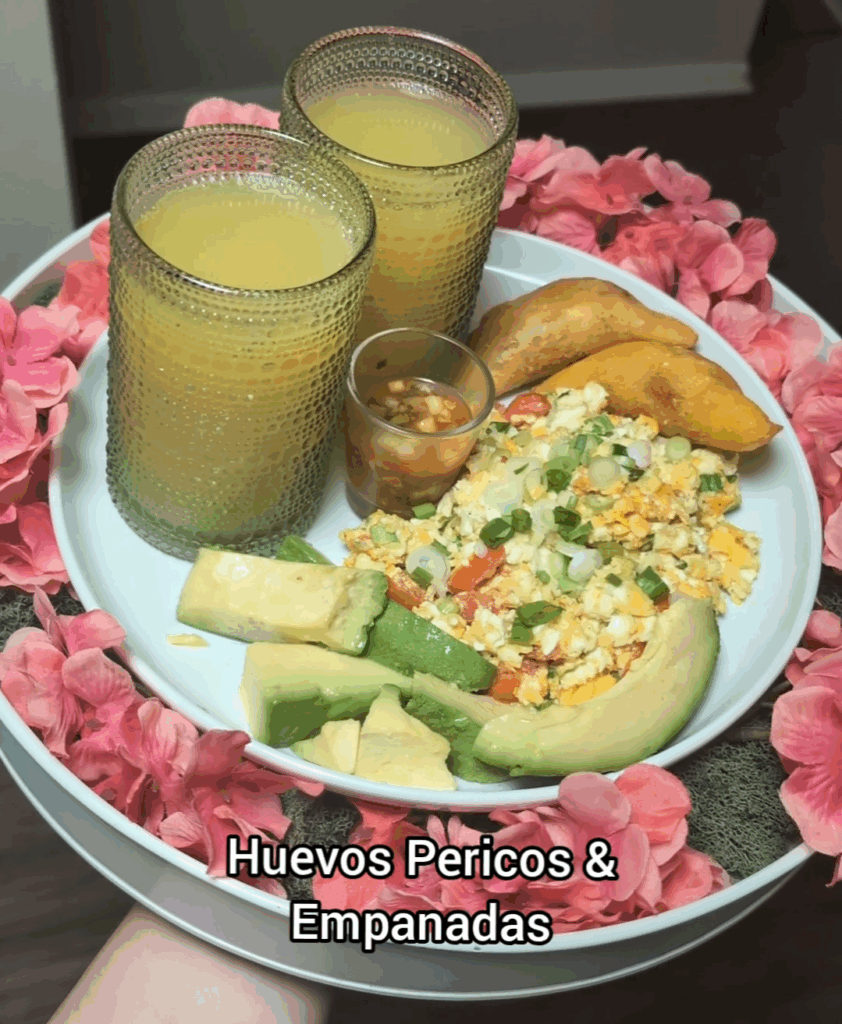
I also served this breakfast dish with orange juice, but I regret it because we had a lot of liquids during this meal. I would recommend not serving any drink with this dish.
Luisa’s Relaxation Libation
I wanted to create a drink that embodied Luisa’s soft side, so I took inspiration from the scene where she is floating in the sky with pink clouds, Colombian confetti, and unicorn donkeys. HAHA!
A pink squirrel cocktail is just the right color for the pink clouds and is super sweet like Luisa. Click below for the recipe I used.
Instead of serving regular whipped cream on top of the drink, I served blue whipped cream to match the blue sky in the background of the scene.
I used red, yellow, and blue sprinkles to decorate the rim of the glass. This tied in the confetti from the scene. I found the little star sprinkles at Michaels craft store, but here is a link to sprinkles on Amazon that will work well too.
Of course, I had to tie in the unicorn donkeys, so I added a glittery white chocolate unicorn horn as a garnish.
To assemble the drink:
- Blue Whipped Cream– I recommend making the whipped cream ahead of time because you can store it in the refrigerator for hours before you even need to use it. To make the whipped cream, add ¼ cup of heavy cream, ½ tbsp of honey, and a drop or two of blue food coloring gel into a medium-sized bowl. With a hand mixer, mix on high until the heavy cream mixture becomes thicker but still fluffy. This recipe makes enough for one drink, so multiply the ingredients depending on how many drinks you are making. When your blue whipped cream is ready, add it to your piping bag with a decorative tip and store in your refrigerator until you are ready to add to the top of your drink.
- Unicorn Horn– To make the white chocolate unicorn horns, start by adding ¼ cup of white chocolate chips and 1 tsp of coconut oil to a microwave-safe bowl. Microwave for 15 seconds at a time and stir well in between. After a few times, your chocolate should be melted. Pour enough melted chocolate into the unicorn horn silicone mold to fill it to the top and freeze the mold for about 5-10 minutes. When the chocolate is completely solidified, carefully pop it out of the mold, and repeat the process until you have enough unicorn horns plus some extras in case some break. To make them glittery, sprinkle some edible glitter on top of the completed unicorn horns. You may need to rub the glitter in with your finger to get it to stick.
- Sprinkled Glass Rim– To make the sprinkles stick to the rim of the glass, I made buttercream frosting. You then dip the rim of your glass into the frosting and lastly into the sprinkles. Put the sprinkles into a shallow bowl so it’s easy to dip. To make the buttercream frosting, add ¼ cup of softened butter, ¼ cup of powdered sugar, and 1 tbsp of milk to a small bowl and mix well to combine.
Once your glass has the sprinkles, fill ¾ of your glass with the pink squirrel drink, top with a swirl of whipped cream, and place the unicorn horn on the whipped cream. Store the drink in your refrigerator until it’s time to serve.
This was one of the last things I prepped before starting the movie because I didn’t want it sitting too long. I made this drink while I was frying the Arepas. Just make sure you are able to multitask so the arepas don’t burn. LOL!
Bruno’s Vision
I was a bit ambitious with this dish, and I definitely would have done some things differently knowing what I know now. With that said, I’m still happy with how it came out!
His vision immediately reminded me of the shattered glass candy I made for my Jurassic Park Movie Night. This candy is basically what a lollipop is made out of, so that was the idea behind this dish. When pouring out the hot candy mixture to dry, I added some lollipop sticks while the mixture was not yet solidified. This made it easier to grab and eat.
I also wanted the glass candy to glow green, like in the movie, so I used a green edible glow-in-the-dark powder and a black light flashlight to give that effect. I made the mistake of adding the powder to the very hot candy mixture, so it separated, and those are the flecks you see in the video. Next time, what I would do is dilute the powder in a little bit of water first, and then add it to the candy mixture. This step should be done during the part of the recipe that says to add flavoring oil.
Another element I added to tie in the scene is the picture of Mirabela from the vision. This proved difficult because most of the pictures I found did not come through clearly underneath the glass candy. I found the best visibility came from this line art picture because of the contrast from black to white. I printed out this picture, wrapped it in plastic wrap, and arranged the broken glass candy on top.

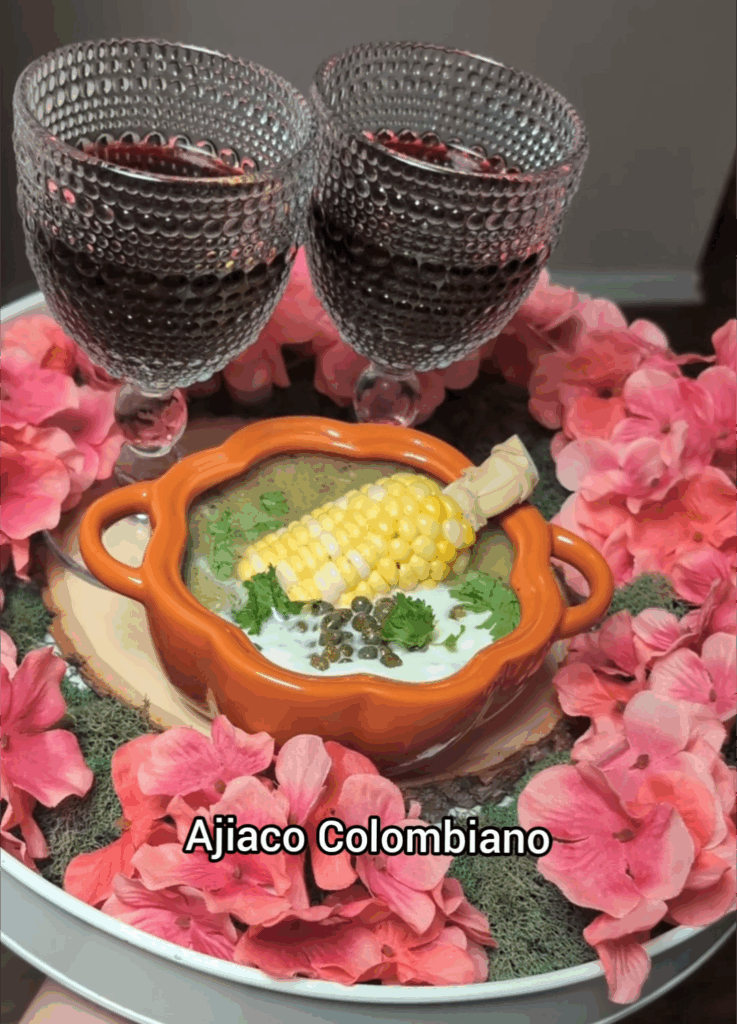
Ajiaco Colombiano
This is a Colombian chicken soup usually served with corn on the cob, cream, capers, and cilantro. Here is the recipe I used!
I recommend making this soup a day before your movie night so you save time on prep the day of. Soup also builds in flavor when it sits in the refrigerator, so it’ll be even tastier the next day. Before you start the movie, I recommend you have all the toppings (including the corn) prepped and easily accessible so when it’s time to serve, you can reheat the soup & corn and quickly add your toppings.
This is the link to the pot I used to serve the soup. If you want a more traditional clay pot like the one you see in the movie, here is a link.
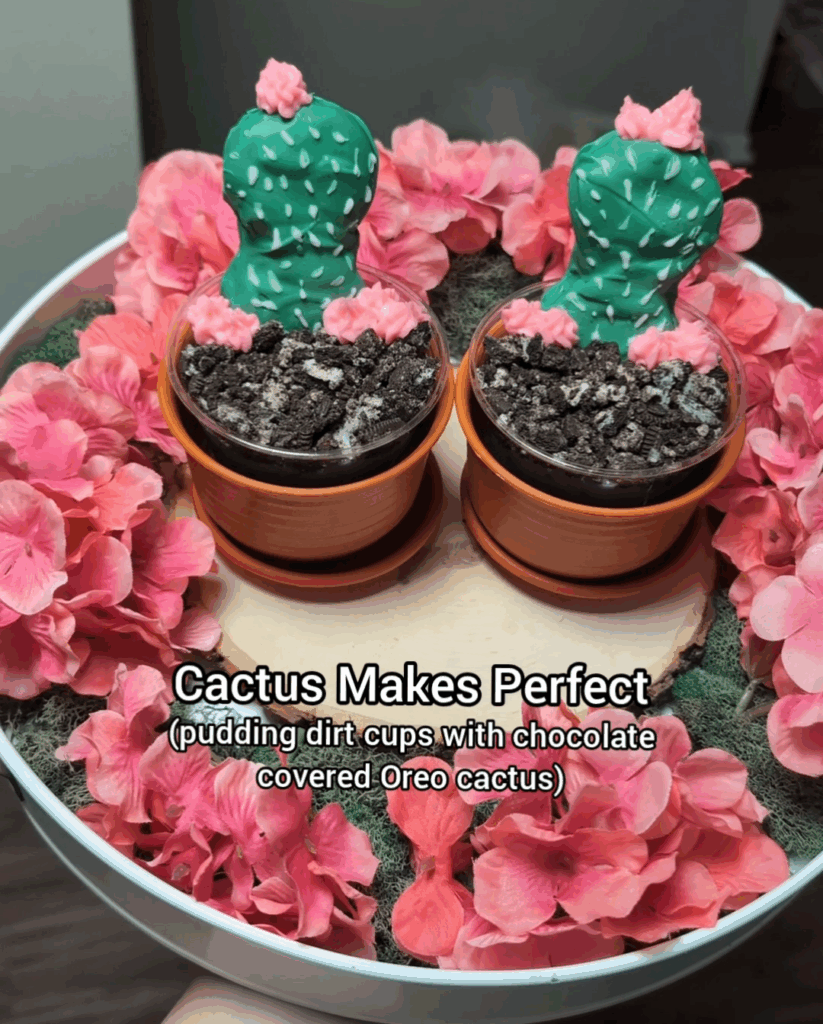
Cactus Makes Perfect
I decided to make a very literal interpretation of Isabella’s song, “What Else Can I Do?”. She spent her whole life trying to be soft and perfect for her family when her true self is prickly and imperfect.
I made a chocolate-covered Oreo Cacti with a pudding dirt cup to resemble the cactus she makes for the first time.
To make the dirt cups, you will need chocolate pudding packets or pre-made, and crushed up Oreos. Make the pudding per the instructions on the packaging. Then crush up the Oreos and sprinkle them on top. I made the dirt cups in disposable plastic cocktail cups and then put those in these small planters.
Chocolate Covered Oreo Cacti:
You will need– Oreos, green melting chocolate (sold at most craft stores in the baking section), melted white chocolate, and pink buttercream frosting.
Step 1: Dipping the Oreos– Add 1 cup of green melting chocolate and 1 tbsp of coconut oil to a microwave-safe bowl. Microwave for 30 seconds and stir well. Then microwave for 15 seconds and stir well again. Repeat in 15-second increments until the chocolate is completely melted. Chocolate is high and sugar, which means it will burn quickly, so it’s important to limit the amount of heat you expose it to.
Line a baking sheet with parchment paper. Using a fork, dip an Oreo into your melted chocolate. Remove the Oreo with your fork and place it on the parchment-lined baking sheet. Repeat with another Oreo. Place the second Oreo next to the first Oreo, making sure they are touching. Scoop some additional chocolate and drizzle it on top of any area on the Oreos that may not be completely covered in chocolate. Also, drizzle some chocolate in between the two Oreos so they have enough chocolate between them to bind them together when the chocolate hardens.
Repeat this until you have enough Cacti. I made a few extras just to have in case. Put the baking tray with the Cacti in your refrigerator for about 30 minutes so the chocolate can completely harden.
Step 2: Making the prickly design– Once the Cacti have completely hardened, you can melt white chocolate chips to make the prickly needle design. To melt the white chocolate, add 1 tbsp of white chocolate chips and ¼ tsp of coconut oil to a microwave-safe bowl. Microwave in 15-second increments, pausing to stir well in between. Once your chocolate is melted, you can take a toothpick or something thin like that and dip it in the melted chocolate. Make little markings all along the Cacti. Place the baking sheet with your decorated Cacti bake in the refrigerator so it can harden for about 5 minutes.
Step 3: Make the Buttercream for the Cactus flowers– I used the leftover butter cream frosting from “Luisa’s Relaxation Libation” and added a drop of neon pink food coloring gel to make it a vibrant pink color. I then added the pink frosting to my piping bag with a decorative tip.
Add the decorated Cacti to the dirt cups, making sure to press them in well so they stay inserted. Then pipe little flowers on top of your Cacti and around the base. I made this dish first thing in the morning of my movie night and stored it in the refrigerator. I recommend doing the same, as it’s easy to knock this off your to-do list early and then focus on the cooking aspect of this movie night after.
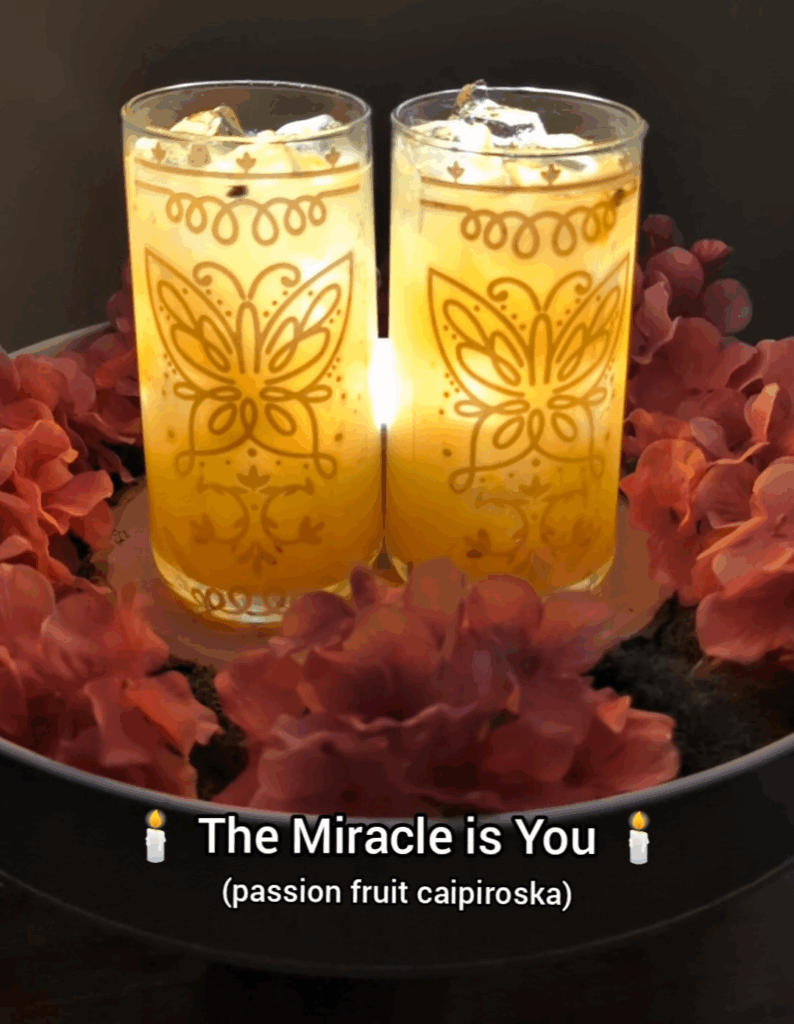
The Miracle is You
I have seen this movie countless times, and this scene ALWAYS makes me emotional! I knew I had to feature the magical butterfly candle, and the scene where Abuela and Mirabel reconcile was the perfect opportunity.
For this scene, I needed to serve something yellow, so I chose a Passion Fruit Caipiroska. This recipe is for a small beverage, so I added lots of ice to my glasses and topped the drinks with club soda. I suggest that you premix the drinks (besides the club soda), before the movie starts. You can even have the premix in your glass and store it in the fridge. Then, when it’s time to serve, you just have to add ice and club soda.
How to Make the Glass Glow: I wanted to make the candle glow like in the movie, so I put a light behind the drink glasses to make them shine. If you don’t have anything to use to backlight the drinks, I suggest getting these light coasters. They will light them up from the bottom and make the whole drink glow.
Butterfly Candel Decal: For the butterfly design, I actually found a stick-on decal usually used for prayer candles. I recommend buying a cheap and tall glass so you don’t mind adding a sticker to it. Apply the sticker to the glass and press well to make sure it’s properly adhered. Then, make sure to peel off the outer plastic. What you are left with is just the golden design. These are now my favorite glasses I own, and the decals were super cheap!
Passion Fruit Caipiroska Recipe