The Nightmare Before Christmas
Culinary Movie Night Guide
Difficulty Level: Hard


Table of Contents
Equipment
Here is a list (with links) of all the equipment and decorations I used for my Nightmare Before Christmas Culinary Movie Night. I would be incredibly grateful if you used my links. I will make a little commission, and that would really help with the cost of the website and related expenses. You can find my full Amazon List here!
To decorate the serving tray, I started with Mellowcrème pumpkin candies scattered around the tray. When Jack visits Christmas Town, I added peppermint candies to tie in the two holidays. It’s a cheap and cute way to capture the theme of the movie. 😊
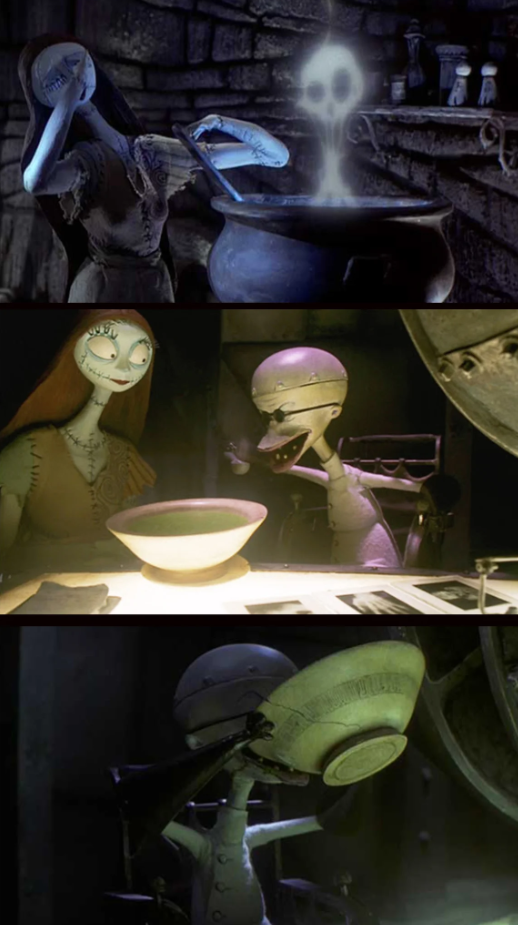
Jake’s Afterlife Crisis

The Christmas Hypothesis

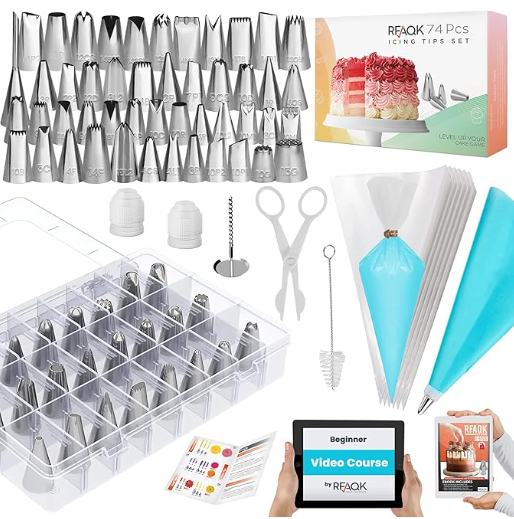
Piping Kit for the following dishes:
Tips
- Personalizing the Menu– When planning your menu for your movie night, don’t feel pressured to serve exactly what I chose to serve. Feel free to remove/add/replace dishes so it makes sense for you and your guests. I’ve included an editable menu in this guide to make it your own!
- Managing Your Time– These movie nights can take a lot of time to prepare, especially if you plan on doing everything yourself. If you are planning a culinary movie night with a group, I suggest doing a potluck style. Have each person contribute a dish or two, and it’ll be very manageable. If you are planning on preparing everything yourself, here are some things I’ve learned while doing these often:
- Make A To-Do List– I can’t stress this enough! It’s very easy to forget simple things like opening a bottle of prosecco before you start the movie so you aren’t fumbling with the seal before serving. I have done this so many times! Your to-do list should include absolutely everything you need to do leading up to pressing play.
- Start Early– I learned this after a few very long days of trying to cook, prepare, and host all on the same day. Anything that can be done in advance should be done during the days leading up to the movie night. Some examples include pre-mixing cocktails, making desserts and other foods like soup that hold up well in the refrigerator, and pre-making any handmade decorations. Hosting is stressful enough without having to make a multi-course meal in one day, so get as much done as possible before.
- No Pausing– The question I get asked the most is “Do you pause the movie to bring out the next dish?”. It’s important to me that I don’t disrupt the flow of the movie, so I do not pause. It’s also important to me to enjoy the movie with my guests. Setting up everything I need before the movie helps me bring out each dish efficiently. The setup usually includes plating each dish and storing it in the refrigerator, so all I have to do is quickly microwave it before serving. I set out any garnish or decoration on my kitchen counter so it’s easily accessible. I even pour the cocktails into their cups and store them in the refrigerator, so all I have to do is add ice and any finishing touches before serving. Always think about how you can do the bare minimum during the film. I always include the setup in my to-do list as well, so I don’t forget about any aspect of the preparation.
- Optional– If your budget permits, I recommend ordering food that you may not be confident in cooking or food that may take a lot of time to cook. I do this occasionally, and it helps cut down the preparation time and supports local businesses. Win Win!
- Decorations- Have fun and decorate your space and serving tray! Add elements from the theme of the movie, but make a budget and stick to it! I usually use things I already own because these movie nights are DIY, and I don’t need to spend a fortune to make it fun. If I do buy decorations for the movie night, I try to find cheap or reusable things. If you are curious about some of the things I’ve used during the movie nights, here is a link to my Amazon List. All these items are things I bought with my own money and enjoyed using.
- Manage Stress- Culinary Movie Nights are fun and a great way to show your friends and family you love them. Sometimes, things you envision in your head will not come out perfectly. When this happens to me, it can be discouraging and stressful, but the people I do these for have NEVER expressed anything but appreciation. Go easy on yourself and remember that your guests are just happy to be there and to experience something you put so much thought and time into making.
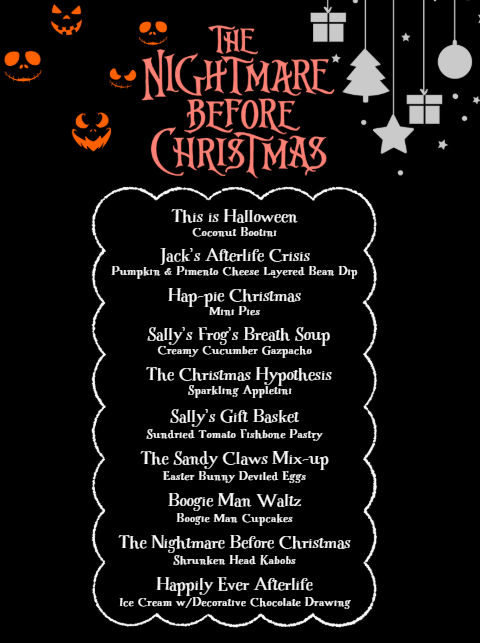
Menu
I have created a free, editable, and printable menu for all the dishes I served for this Culinary Movie Night! Feel free to change it to what will work for you and your guests.
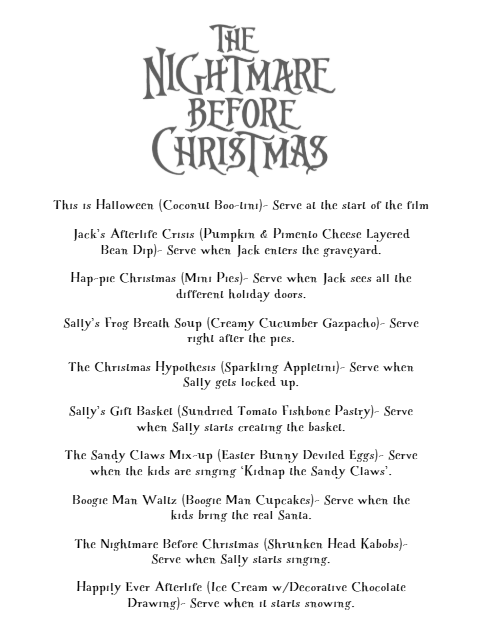
Cues
These are the cues I used during the movie night so I knew when I had to get the next dish ready to serve.
Please note: Each cue describes a scene that happens a few minutes before I have to serve the dish. It does not describe the scene the dish is based on. Some people get confused with that, so I thought I should specify. Because the cues only give you a few minutes to prepare the dish, it’s very important to have everything cooked and set up before the film starts. Review the “Tips” section above for ways to make this seamless.
I often get asked why I don’t use time stamps to keep track of when to serve the next dish and the simple answer is, I don’t find those helpful. If I used timestamps, I would have to have a separate timer going or keep disrupting the movie to check the timestamp. It makes much more sense to have cues to indicate when the next scene is about to happen. This allows me to enjoy watching the film with my guests.
Below is the link to the cues I used. This document is editable, so you can make updates if you decide to take out or change dishes.
Recipes
This is Halloween
Coconut Boo-Tini Recipe
Ingredients: Makes 1
3 oz coconut rum
2 oz coconut cream
2 oz coconut milk
1 oz simple syrup
Mellowcrème pumpkin candy & plastic food picks (for garnish)
A plastic cocktail cup and a Sharpie to draw the ghost faces
Instructions:
Add the coconut rum, coconut cream, coconut milk, and simple syrup to a jar with a lid. Shake to combine ingredients and store in your refrigerator. Make sure to multiply ingredients depending on how many people you are serving. I recommend making a little extra to make sure you have enough liquid to fill the cups to complete the ghost faces.
I like to premix my drinks the day before the movie night, so I save time on prep work the day of. This also gives time for the drink to get nice and cold in the refrigerator. I also made sure to decorate the plastic cups with the ghost faces the day before.
The day of the movie night, I set out my decorated cups, skewered the candy pumpkins, and placed the garnish in the cups. I left them on my counter, and when I was ready to start the movie, I shook my premixed cocktail well and poured it into the cups before serving.
Non-alcoholic Recipe
Ingredients: Makes 1
3 oz coconut cream
3 oz coconut milk
2 oz simple syrup
Instructions:
Follow the same prep instructions as the alcoholic version. This version is creamy and sweet. Perfect for kids and anyone who doesn’t drink alcohol.
Jack’s Afterlife Crisis
To add the pumpkin element to this Pimento Cheese Dip, I added 1 cup of canned pumpkin puree to this recipe. Because I was adding another ingredient, I adjusted the seasonings to taste.
For the chips, I used the fall leaf tortilla chips from Trader Joe’s to make this dish more festive. If you can’t shop at Trader Joe’s, you should still be able to find a few fall chip options from other stores around the last few months of the year. I also served the chips in this Pumpkin dish.
To assemble this dish:
I first started by adding my bean dip to the bottom half of the bowl. Make sure to reserve some bean dip for the Jack design on top.
Next, I layered my Pumpkin and Pimento Cheese Dip, making sure to completely cover the bean dip on the bottom.
Now it’s time to create the Jack design. I added the bean dip I reserved to my Piping Kit with a fine tip for precision. I freehanded the design on top using this picture as a reference. If you mess up, gently scrape your mistake off and keep going. As you can see from my design, it doesn’t have to be perfect. Jack is basically a stick figure. LOL!

I prepped this dish the morning of movie night since the dip does not need to be served fresh. Make sure to wrap it in plastic wrap so it stays fresh in your refrigerator. Just be careful that the plastic doesn’t sit on the design and squish it.

Hap-pie Christmas
This recipe folded the pies in half, but I chose to make them circular to match the film. You can also add other fillings besides apple pie, like pumpkin pie or minced meat pie. I made the mini pies the day before and froze them so they stayed fresh.
Then, after I served the first drink, ‘This is Halloween’, I put the mini pies in the oven on a baking sheet at 350 degrees F. They’ll be ready by the time you need to serve (about 10 minutes or so).
This is when I also added peppermint candies to the serving tray to bring the two holidays together.

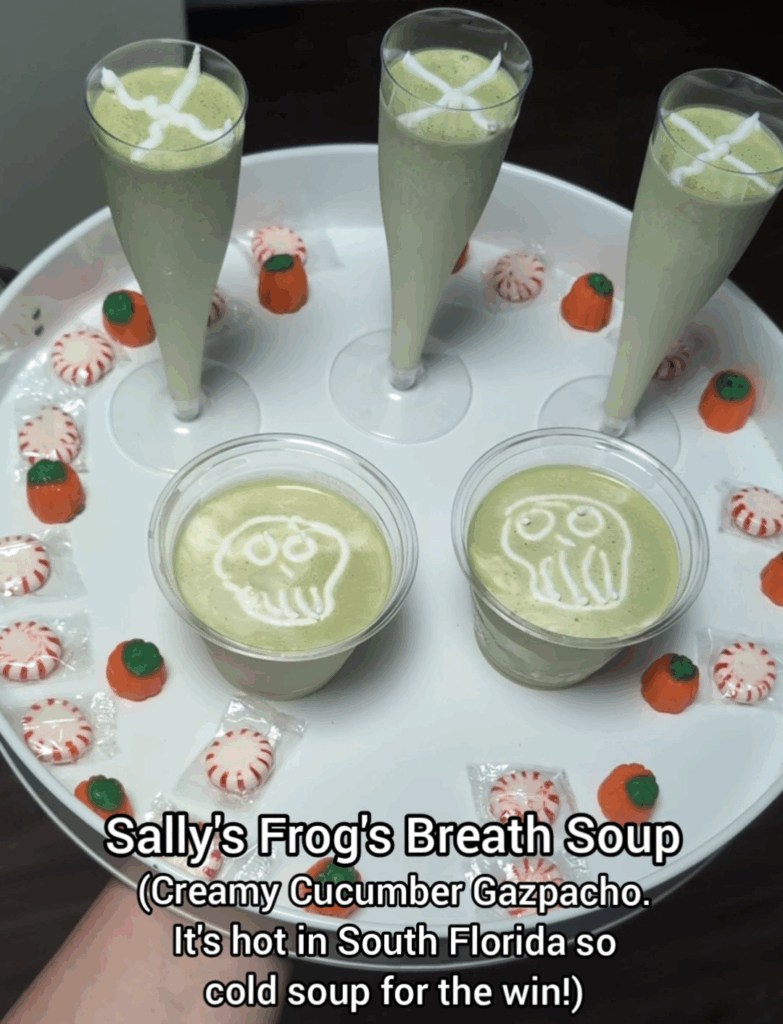
Sally’s Frog Breath Soup
Creamy Cucumber Gazpacho Recipe
This is a vegan recipe, but you can use non-vegan versions of the ingredients to make the soup as well.
To make the cream skull topping, I whipped heavy cream to thicken it. Then, I added the whipped cream to the Piping Bag with a thin tip for precision. I ran out of the plastic cocktail cups, so I piped skulls on the two I had left and then an X on the others since I couldn’t fit the skull design. I pipped it by hand. They aren’t perfect, but I think they came out cute!
I set up these cups of the soup and the skull design after my friends arrived and right before pressing play. I didn’t want to fumble around with piping the design during the movie. I stored them in the refrigerator until it was time to serve.
If you want to serve a warm soup, here is a recipe with ingredients like peas, broccoli, and leeks.
The Christmas Hypothesis
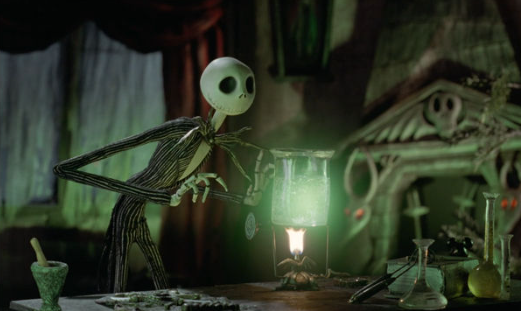
To make this recipe “sparkling”, I topped the vials with a bit of club soda. I premixed the cocktail the day before to save time during the day of movie night, but I didn’t add the club soda until right before serving.
You can also top this non-alcoholic version with club soda or Sprite to make it sparkling as well.

Sally’s Gift Basket

I used premade pie dough crust from the grocery store for this dish because when you slightly wet it, it becomes easy to shape like clay. The premade pie crust is usually in the dairy section by the canned biscuits. It usually comes with two circular sheets. You’ll need both to create the bottom layer and top layer of the Fishbone Pastry.
For the filling, I used a jar of sundried tomato pesto. You can also add some seasoned ground beef if you want to add meat. To create the shape of the fishbone, I stacked both pie dough sheets on top of each other and used a knife to cut out the shape of the fishbone. Make sure the bone pieces aren’t too thin because you need enough room to add the filling.
After you cut out your fishbone shape, take the top layer and cut out the eye and mouth. Set aside all your scraps because you’ll use them later. Start filling your bottom layer with the pesto filling. Make sure to leave the edges clear of the filling so it doesn’t spill out when you put the top layer. Next, place the top layer with the cut-out eyes and mouth on top.
Wet your fingers and pinch the edges together to seal the fish bone pastry. It won’t be perfect. This is where the scraps come in. Using wet fingers, I took pieces of the scraps and covered any part of the pastry that I couldn’t seal completely. This also gives the pastry more texture and makes it look more realistic.

When you’re happy with the results, brush an egg wash on top of the pastry. This gives it a glossy look when you bake it. To make the egg wash, just whisk an egg or egg yolk and use that liquified egg as the egg wash.
I wanted to serve this pastry freshly baked, so I premade it earlier in the day and baked it during the movie. Store the unbaked pastry on a baking sheet with parchment paper and cover the top with plastic wrap. Store it in the refrigerator.
I recommend baking it in your preheated oven after you take the mini pies from ‘Hap-pie Christmas’ out of the oven. Bake the fishbone for about 10 minutes and serve.
I served the pastry with red wine, but if you don’t want to serve alcohol, you can go for a non-alcoholic wine or grape juice.
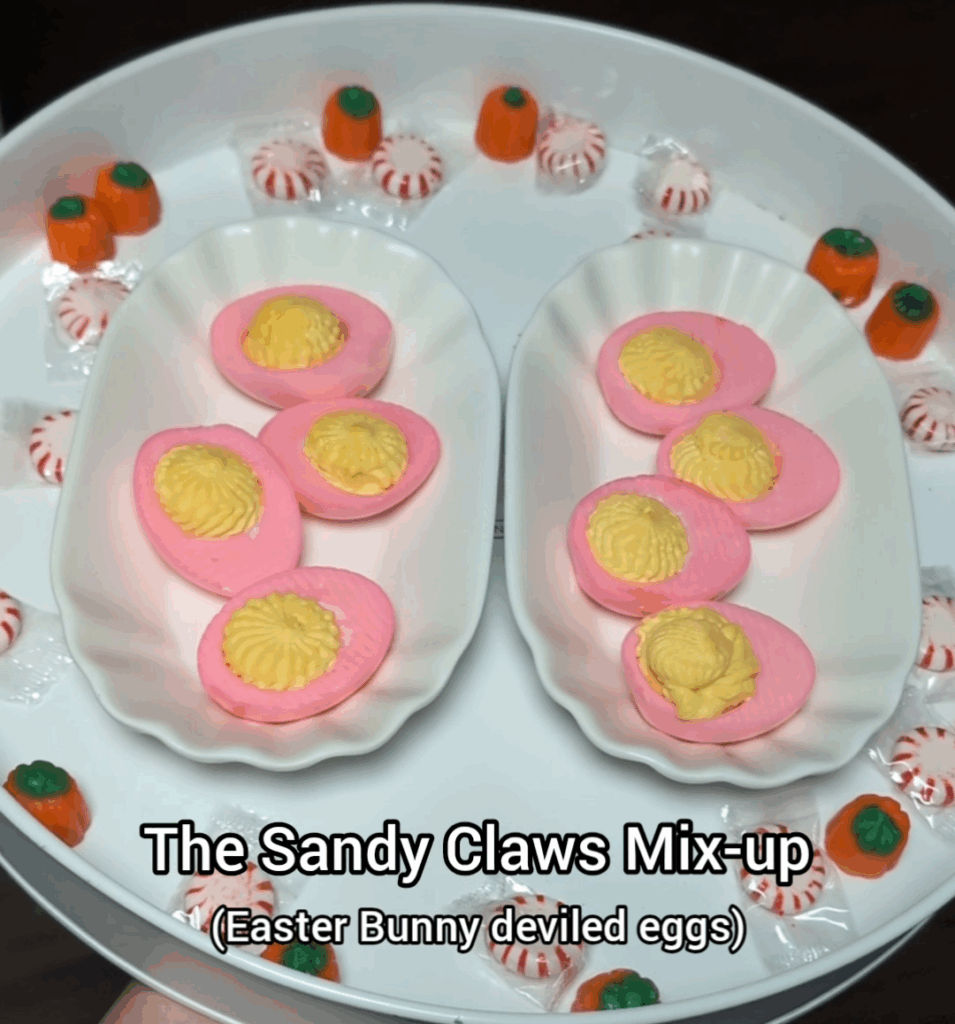
The Sandy Claws Mix-up

Easter Bunny Deviled Egg Recipe
Ingredients- Makes 12 deviled eggs
6 hard-boiled eggs
Pink food coloring
Ingredients for filling:
6 hard-boiled egg yolks
2 ½ tbsp of mayo
2 tsp of pickle juice
1 tsp of sugar
1 tsp of yellow mustard
Salt and pepper, to taste
Pink food coloring
Instructions:
Hard-boiled eggs– Fill a medium pot halfway full with water and bring to a boil. Once boiling, add your 6 eggs to the pot. I like to use a large spoon and gently submerge each egg one by one so it doesn’t get shocked by the hot water and crack. Cook your eggs in boiling water for 11-12 minutes. Do not cook longer, or your yolks will start turning green. Take your cooked eggs out of the pot with the same spoon and place them in a bowl. Let the bowl sit in the refrigerator for about an hour to cool off.
Coloring eggs Pink- Once your hard-boiled eggs are cooled, gently peel the shell. I find it’s easy to peel the shell by gently rolling the egg on your countertop until there are cracks all over the egg. You can then start peeling from the fatter end of the egg because that is usually where there is empty space. Once peeled, rinse your eggs to remove any small pieces of shell. Cut each egg in half. Gently remove all egg yolks and set aside in a medium bowl for the filling. Rinse your empty egg white to remove any additional egg yolk.
Fill a large bowl with water, a little over half full. Add a few drops of pink food coloring and mix until the water turns a vibrant pink. Place all your empty egg whites in the pink food coloring water and make sure they are all submerged. Let soak for about 10 minutes, until the eggs become pink. Filling- In a medium bowl, add all your egg yolks, mayo, pickle juice, sugar, yellow mustard, and salt and pepper to taste. With a hand mixer, blend all ingredients until smooth. Make sure to taste it and adjust the seasoning to your preferred taste. Pipe the eggs either using a sandwich bag with a hole cut out on the corner, or using the piping kit I used, linked in the Equipment Section.
I made these deviled eggs earlier in the day and stored them in the refrigerator. I already had them plated before starting the movie, so it was easy and quick to serve.
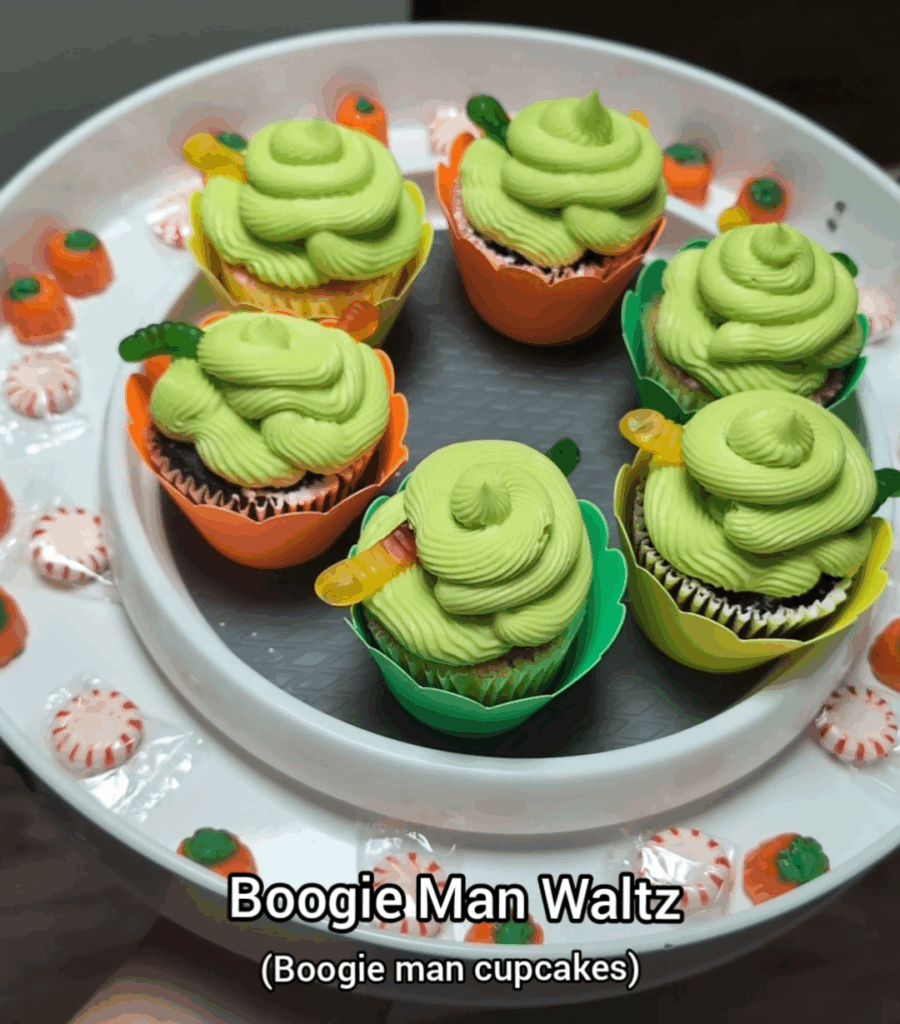
Boogie Man Waltz

I made chocolate cupcakes with a vanilla buttercream frosting. To make the frosting green, I used neon green food coloring gel. I added a few drops to the buttercream until I was happy with the color. To pipe the cupcakes, I used this piping kit.
I also added gummy worms to the cupcakes to tie in all the bugs that come out of the Boogie Man. These cupcakes do not need to be refrigerated, so I plated them on the little rotating plate and kept them on my kitchen counter for easy access.
To save time, I baked the cupcakes the day before, and then I frosted them the day of the movie night.
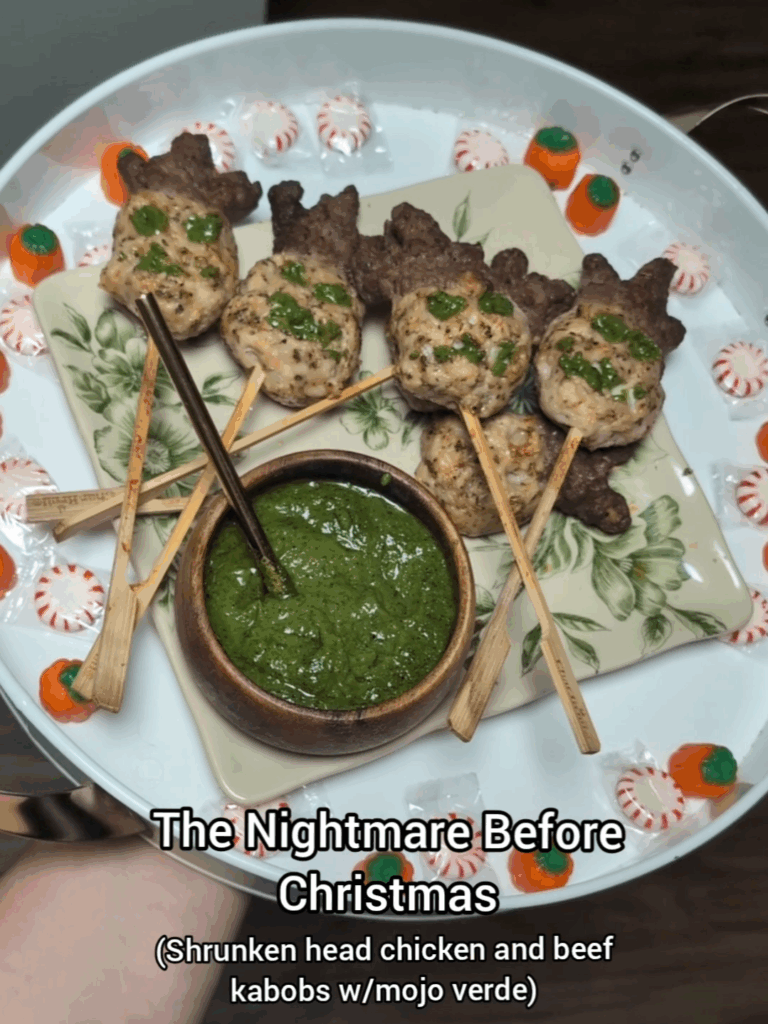
The Nightmare Before Christmas
This dish is so random, but I just had to include it. The scene where the kid shows their parents what Santa brought makes me cackle every time I watch it. I wanted to replicate those cursed-looking shrunken heads, so I decided to serve shrunken-headed kebobs. I used ground beef for the hair, ground chicken for the head, and a mojo verde sauce to dip and also to make the eyeballs and mouth of the shrunken head stand out. The result was an absolutely cursed looking dish. Perfect for the theme!
I used the same seasonings for both the beef and chicken, so the taste was cohesive. Here is the Kebab Recipe I used. I used my hands to shape the shrunken heads and press the beef hair firmly onto the chicken heads. Wow… that’s a weird sentence LOL!
Here is the Mojo Verde Recipe.
I made the sauce and kebobs earlier in the day, plated them, and stored them in the refrigerator. When it was time to serve, I microwaved the plate and served.
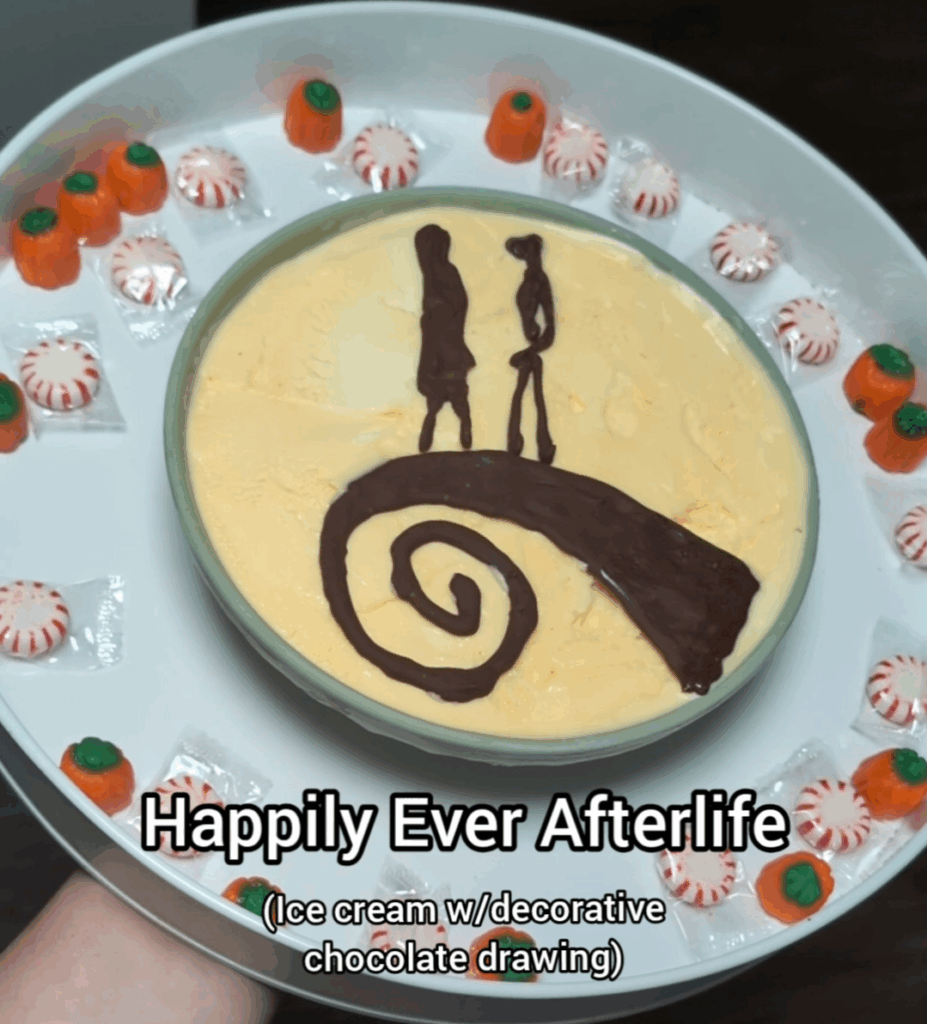
Happily Ever Afterlife
For the final dish, I decided to serve ice cream to accompany the snowy backdrop of Halloween Town. I also wanted to call back to ‘Jack’s Afterlife Crisis’ layered dip. But adding Sally.
To start, I filled a wide and shallow bowl with ice cream, making sure to scrape the top to make it an even canvas. Making sure the bowl is wide is important because that gives you more space for the chocolate mold. I wrapped the bowl in plastic wrap and stored the bowl in the refrigerator.
Making the Chocolate Mold:
This is the picture I used as a reference for the chocolate mold.

To make the mold, you can either freehand it or print out the reference photo and trace the image. If you want to trace the image for accuracy, make sure to resize the image to fit the bowl you will be using before printing the image.
After you print the image, place parchment paper on top of the printout. This will be the tracing paper. If you are free-handing the chocolate mold, you will still do it on top of parchment as well.
Add melted chocolate to a piping bag with a fine tip for accuracy. You don’t want the chocolate to be too runny so if it is, let it sit for a few minutes to thicken up before drawing your chocolate mold.
Here is a picture showing how tracing an image looks.

How to melt chocolate– Add 1 cup of chocolate chips to a microwave-safe dish and 1 tbsp of coconut oil. Microwave the dish for 30 seconds and stir well. Microwave again for 15 seconds and stir well again. Keep microwaving and stirring in 15-second increments until the chocolate is melted. You have to microwave in short amounts because chocolate contains a lot of sugar, so it will burn quickly if it gets too hot.
Once your chocolate is melted and at the right consistency, add the melted chocolate to the piping bag and start tracing the image. I recommend having the parchment paper you are tracing on, also on top of a baking tray or something flat, so when it’s time to move the chocolate mold to the refrigerator, you can just put the whole tray in there and not disrupt the chocolate.
Leave the chocolate mold in your refrigerator to completely harden for about 20-300 minutes. Once it’s completely hardened, take out your ice cream bowl and unwrap it. Then, you can VERY carefully pick up your chocolate mold and place it on top of the ice cream. Wrap it back up and store it in your freezer until it’s time to serve. If you are worried about the chocolate mold breaking, you may want to make a second mold as a backup.
This is a dish I made sure to have prepared earlier in the day. I did not want to risk messing with the chocolate mold as I was serving. I recommend you do the same. That way, it’s easy to serve because you just need to unwrap the bowl, and it’s ready.