Freaky Friday
Culinary Movie Night Guide
Difficulty Level: Easy


Table of Contents
Equipment
Here is a list (with links) of all the equipment and decorations I used for my Freaky Friday Culinary Movie Night. I would be incredibly grateful if you used my links. I will make a little commission, and that would really help with the cost of the website and related expenses. You can find my full Amazon List here!
To decorate the serving tray, I used a cutting board as the “clipboard” and taped a big DETENTION sign on the top to match the clipboard in the film. I also added Fender medium picks as a callback to Anna’s pick she carries around at school.
Tips
- Personalizing the Menu– When planning your menu for your movie night, don’t feel pressured to serve exactly what I chose to serve. Feel free to remove/add/replace dishes so it makes sense for you and your guests. I’ve included an editable menu in this guide to make it your own!
- Managing Your Time– These movie nights can take a lot of time to prepare, especially if you plan on doing everything yourself. If you are planning a culinary movie night with a group, I suggest doing a potluck style. Have each person contribute a dish or two, and it’ll be very manageable. If you are planning on preparing everything yourself, here are some things I’ve learned while doing these often:
- Make A To-Do List– I can’t stress this enough! It’s very easy to forget simple things like opening a bottle of prosecco before you start the movie so you aren’t fumbling with the seal before serving. I have done this so many times! Your to-do list should include absolutely everything you need to do leading up to pressing play.
- Start Early– I learned this after a few very long days of trying to cook, prepare, and host all on the same day. Anything that can be done in advance should be done during the days leading up to the movie night. Some examples include pre-mixing cocktails, making desserts and other foods like soup that hold up well in the refrigerator, and pre-making any handmade decorations. Hosting is stressful enough without having to make a multi-course meal in one day, so get as much done as possible before.
- No Pausing– The question I get asked the most is “Do you pause the movie to bring out the next dish?”. It’s important to me that I don’t disrupt the flow of the movie, so I do not pause. It’s also important to me to enjoy the movie with my guests. Setting up everything I need before the movie helps me bring out each dish efficiently. The setup usually includes plating each dish and storing it in the refrigerator, so all I have to do is quickly microwave it before serving. I set out any garnish or decoration on my kitchen counter so it’s easily accessible. I even pour the cocktails into their cups and store them in the refrigerator, so all I have to do is add ice and any finishing touches before serving. Always think about how you can do the bare minimum during the film. I always include the setup in my to-do list as well, so I don’t forget about any aspect of the preparation.
- Optional– If your budget permits, I recommend ordering food that you may not be confident in cooking or food that may take a lot of time to cook. I do this occasionally, and it helps cut down the preparation time and supports local businesses. Win Win!
- Decorations- Have fun and decorate your space and serving tray! Add elements from the theme of the movie, but make a budget and stick to it! I usually use things I already own because these movie nights are DIY, and I don’t need to spend a fortune to make it fun. If I do buy decorations for the movie night, I try to find cheap or reusable things. If you are curious about some of the things I’ve used during the movie nights, here is a link to my Amazon List. All these items are things I bought with my own money and enjoyed using.
- Manage Stress- Culinary Movie Nights are fun and a great way to show your friends and family you love them. Sometimes, things you envision in your head will not come out perfectly. When this happens to me, it can be discouraging and stressful, but the people I do these for have NEVER expressed anything but appreciation. Go easy on yourself and remember that your guests are just happy to be there and to experience something you put so much thought and time into making.
Menu
I have created a free, editable, and printable menu for all the dishes I served for this Culinary Movie Night! Feel free to change it to what will work for you and your guests.

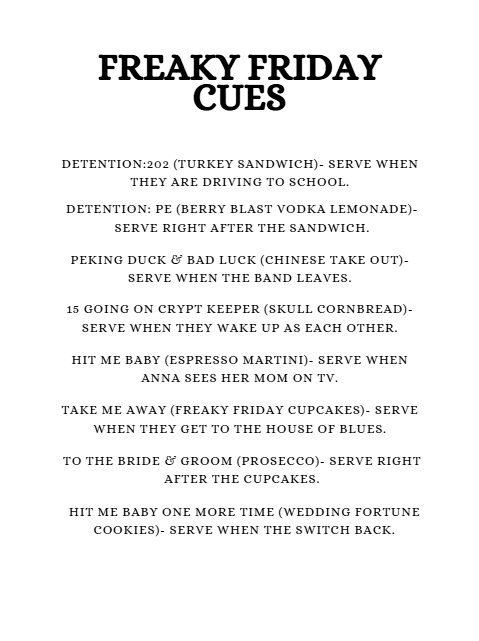
Cues
These are the cues I used during the movie night so I knew when I had to get the next dish ready to serve.
Please note: Each cue describes a scene that happens a few minutes before I have to serve the dish. It does not describe the scene the dish is based on. Some people get confused with that, so I thought I should specify. Because the cues only give you a few minutes to prepare the dish, it’s very important to have everything cooked and set up before the film starts. Review the “Tips” section above for ways to make this seamless.
I often get asked why I don’t use time stamps to keep track of when to serve the next dish and the simple answer is, I don’t find those helpful. If I used timestamps, I would have to have a separate timer going or keep disrupting the movie to check the timestamp. It makes much more sense to have cues to indicate when the next scene is about to happen. This allows me to enjoy watching the film with my guests.
Below is the link to the cues I used. This document is editable, so you can make updates if you decide to take out or change dishes.
Recipes
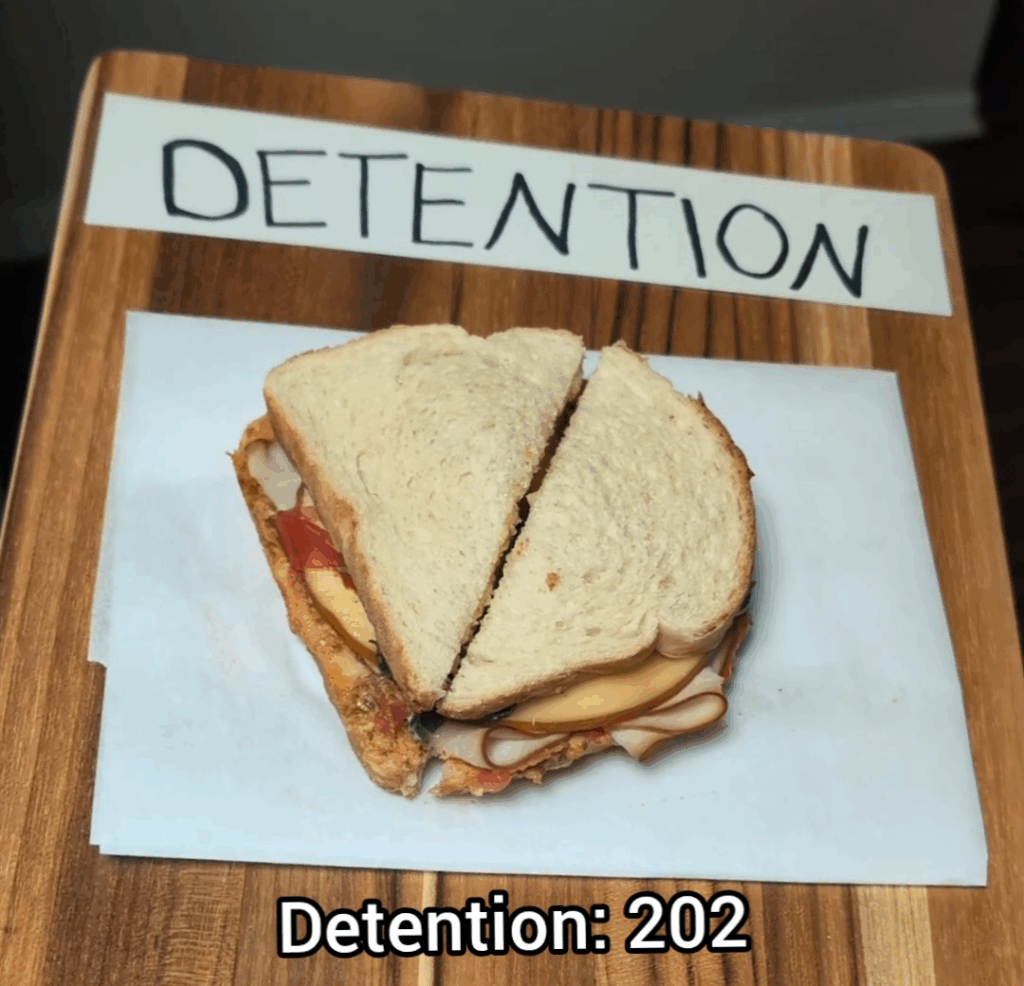
Detention: 202
These first scenes with the detention clip board inspired my serving tray, and it was such a blast from the past! Why did schools always try to make everything so embarrassing for the students? My teachers used to have the biggest bathroom hall passes to discourage students from using the bathroom. UGH!
For this scene, the detention teacher trades their lunch with Anna. Meatloaf and turkey. I chose a turkey sandwich, but meatloaf could work for this scene too!
The sandwich I made had smoked turkey, smoked gouda, mayo, mustard, sundried tomato pesto, and an arugula salad. The arugula salad is just arugula with a dash of olive oil, lemon juice, and a pinch of salt.
This is the first thing you serve, so it should be made right before you start the film. This will keep the bread from getting soggy.
Fun fact about me: If I could only eat one thing for the rest of my life, it would be a sandwich. So, I have to pat my back on this one because it was delicious, and my friend still talks about it!
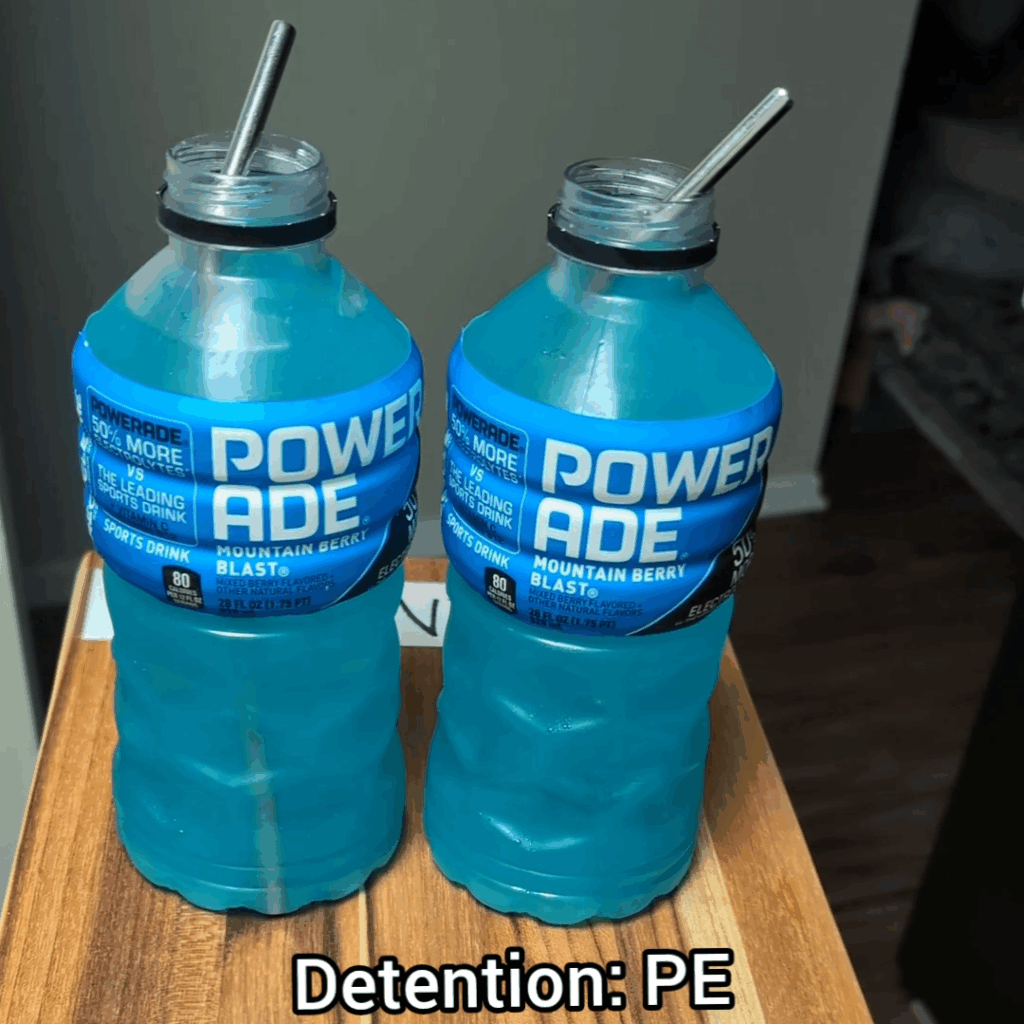
Detention: PE
For this scene, Anna brings an extra blue electrolyte drink for the detention teacher, so I wanted to serve a cocktail version.
This one was really simple to make and super refreshing! I will definitely be making this again for the pool!
What you’ll need:
Mountain Berry Blast Powerade
Lemonade (Strawberry lemonade is another good option)
Vodka
Blue Curacao
How to Make:
First, pour out the Berry Blast Powerade into a different container so the bottles are empty. Then fill the bottles with ice and put them in your freezer so they stay frozen. I recommend doing all this before you start the movie to save time.
When it’s time to serve, add 3 oz of vodka to each bottle. Then fill half the bottle with Powerade and the other half with lemonade. Add a dash of blue curacao on top to add some blueness back. Stir with the straw and serve.
I recommend having all of these ingredients readily available so you can quickly make the drink before serving. There is not much time between the first scene and this scene, so you have to work fast.
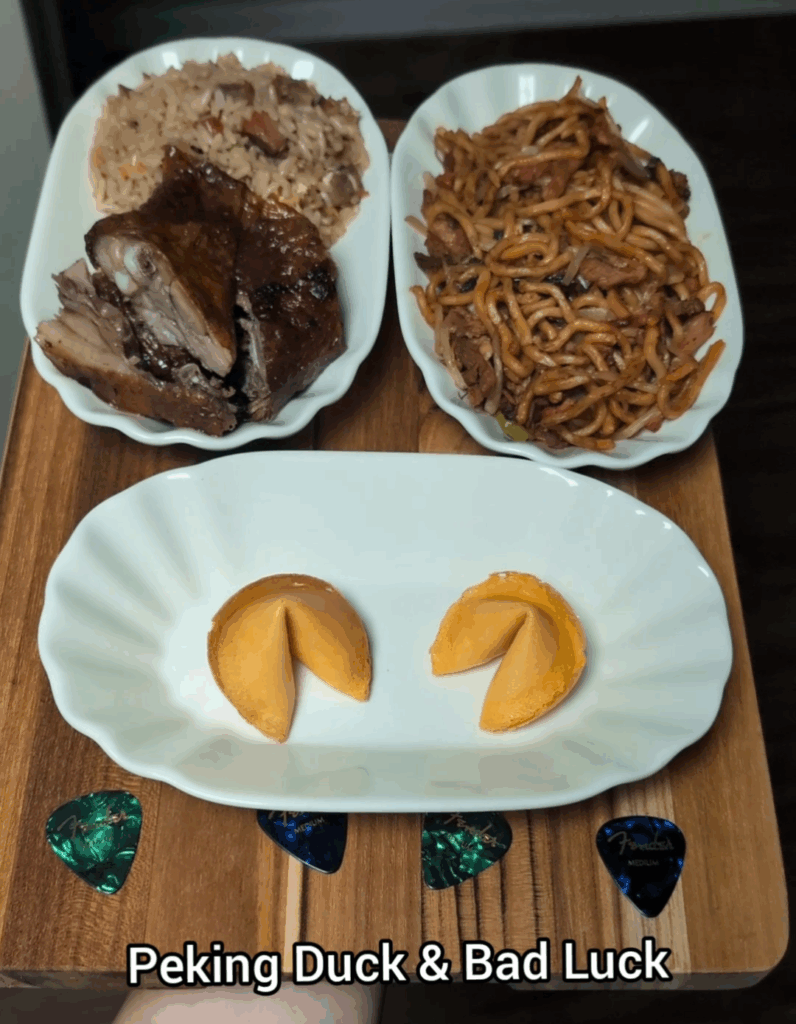
Peking Duck & Bad Luck
For this iconic scene, the family went to their favorite Chinese restaurant. Anna and her mom are fighting and are given the magical fortune cookies that make them change bodies.
I ordered Chinese takeout for this scene. Anna’s favorite is the Peking duck so, of course, we had to have that! Also, the fortune cookies are a must!
I also ordered pork fried rice and pork Lo Mein, but you can switch those dishes up and order something different.
I recommend timing out the takeout pickup/delivery close to when you plan to watch the film so you can have the food fresh. I transferred the food to the serving dishes before starting the film and kept them covered on my stove top. When it was time to prepare to serve the food, I quickly microwaved the food to reheat.
Tip: Make sure wherever you order has fortune cookies. I had to order from two different places because the place that had Peking duck did not have fortune cookies. Also, make sure they provide enough fortune cookies for your guests. The last dish I served was chocolate dipped fortune cookies so I needed enough for this dish and that dish.
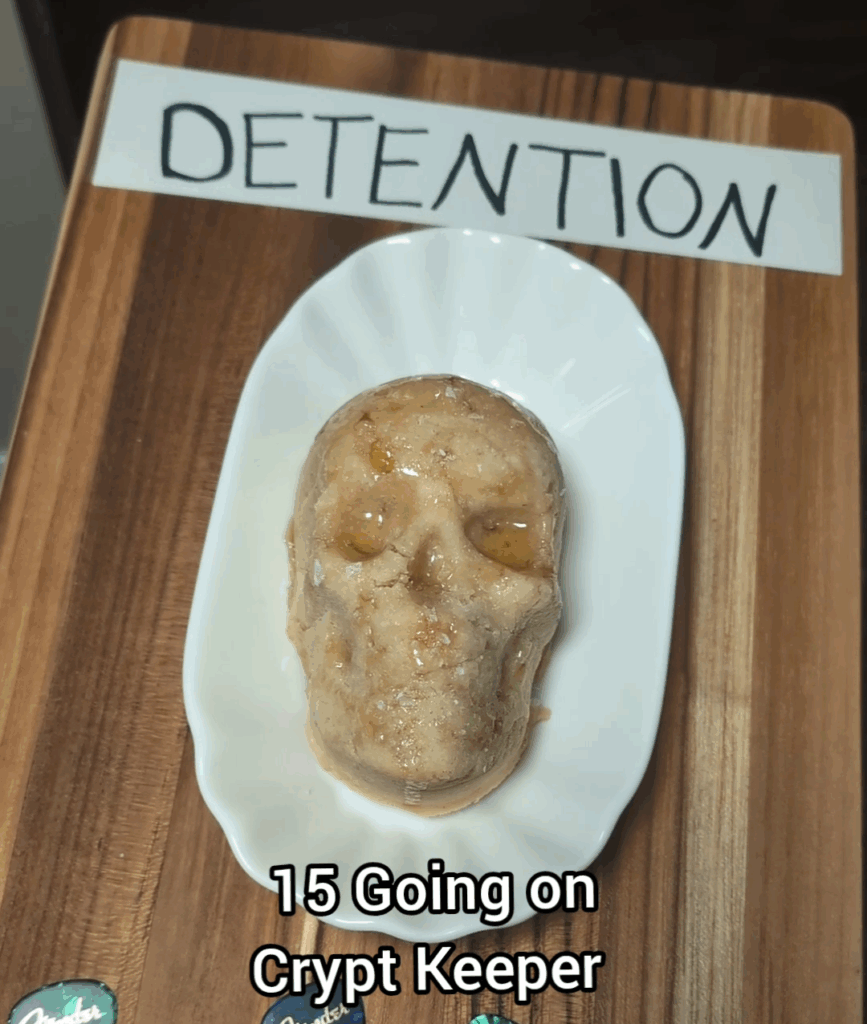
15 Going on Crypt Keeper
One of the funniest scenes in the film is Jamie Lee Curtis, playing Anna, seeing herself old for the first time and comparing her mother to the likeness of the Crypt Keeper. Ouch! LOL! To represent this scene, and the Crypt Keeper, I decided to serve a skull cornbread with honey and flaky salt on top. This is my go-to recipe anytime I make corn bread. It’s the BEST recipe!
This is the silicone mold I used for the cornbread skulls. Follow the recipe as normal, but instead of transferring the batter into a pan, transfer it to the silicone mold instead. Fill the skulls almost to the top, leaving a little room for the batter to rise.
Hit Me Baby
This scene starts at a coffee shop where Anna’s crush, Jake, is crushing on Anna’s mom, but it’s actually Anna. It’s honestly so weird watching it as an adult, but as kids, we were swooning!
I chose to serve an Espresso Martini since they are drinking coffee while singing to Britney Spears. Here is the recipe I used for the Espresso Martini. I did add a little extra simple syrup to make it less strong. I would also recommend adding an egg white to make the froth on top like they are served at restaurants. When I shook it, there was froth, but it disappeared very quickly.
I also recommend premixing this cocktail and storing it in the fridge to save time. That way, when it’s time to serve, all you have to do is shake it really well and pour it into the glasses.

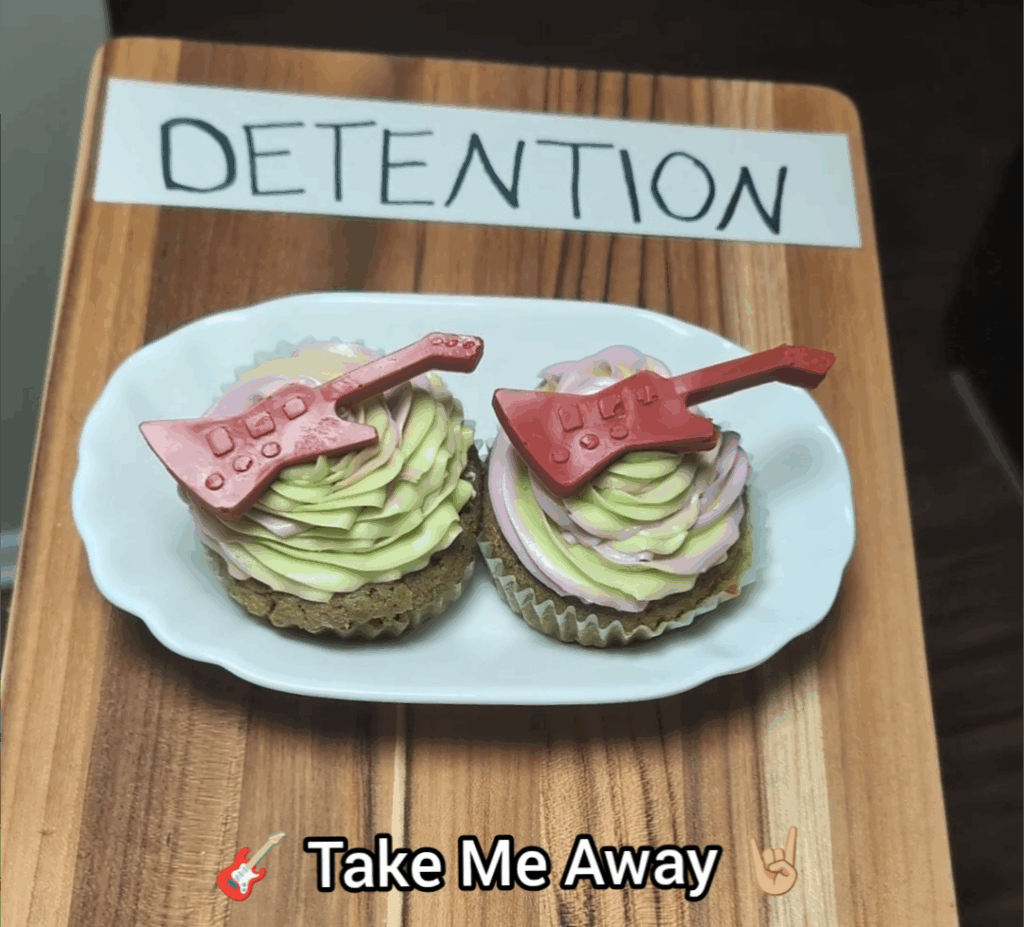
Take Me Away
In my video, I featured the solo Jamie Lee Curtis KILLS! It’s iconic, but it’s also the only footage that was usable because me and my best friend were belting the lyrics to Take Me Away. HAHA!
To represent this scene, I served Matcha cupcakes with a green and purple buttercream swirl and a red chocolate guitar on top. I wanted the green and purple colors to signify Anna and her mom finally starting to appreciate each other in this moment. And the red guitar is to match Anna’s for her killer solo.
Matcha Cupcake Recipe with Vanilla Buttercream
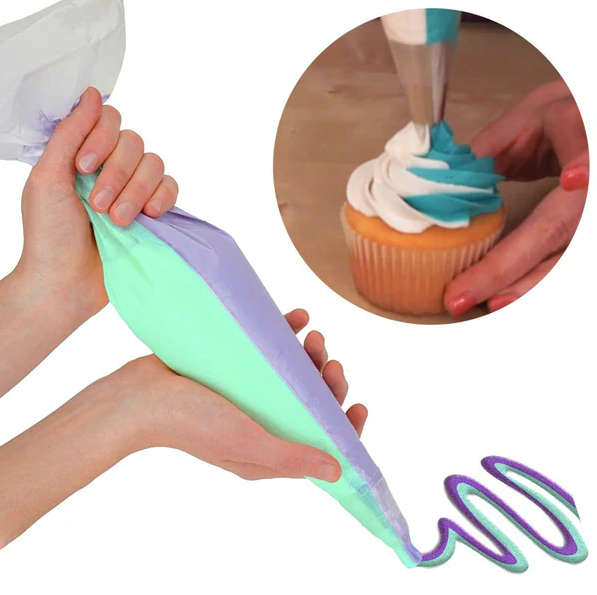
After you make the buttercream frosting, split it into two bowls. Add a few drops of green food coloring gel to one and purple food coloring gel to the other. Mix and add more if you want the color to be bolder. Set up your piping bag with the tip you want and add the green frosting to one side of your bag and the purple to the other. Some people like to have each color in its separate bag and then they share one tip. This creates a cleaner swirl, but it’s an extra step I usually skip. I actually like it when they blend a bit. It makes it look like a flower.
Red Chocolate Guitars: To make these chocolate guitars, you will need ½ a cup of red melting chocolate. You can buy these at most craft stores like Michaels. Add the chocolate and ½ tbsp of coconut or vegetable oil to a microwave-safe dish. Microwave for 30 seconds, then stir and microwave for another 15 seconds and stir. Keep microwaving for 15 seconds and stir until the chocolate is completely melted. Chocolate burns very easily, so you can’t expose it to too much heat.
Once the chocolate is melted, pour it into the guitar molds. Let them sit in your refrigerator for about 30 minutes to harden. Then very carefully push them out of the mold, being careful not to snap the neck of the guitars. Place them on your frosted cupcakes and plate the cupcakes on the serving dish.
You can keep these on your kitchen counter until you’re ready to serve. This is an easy one to grab and serve during the movie, as long as you have it ready to go before you start the movie.
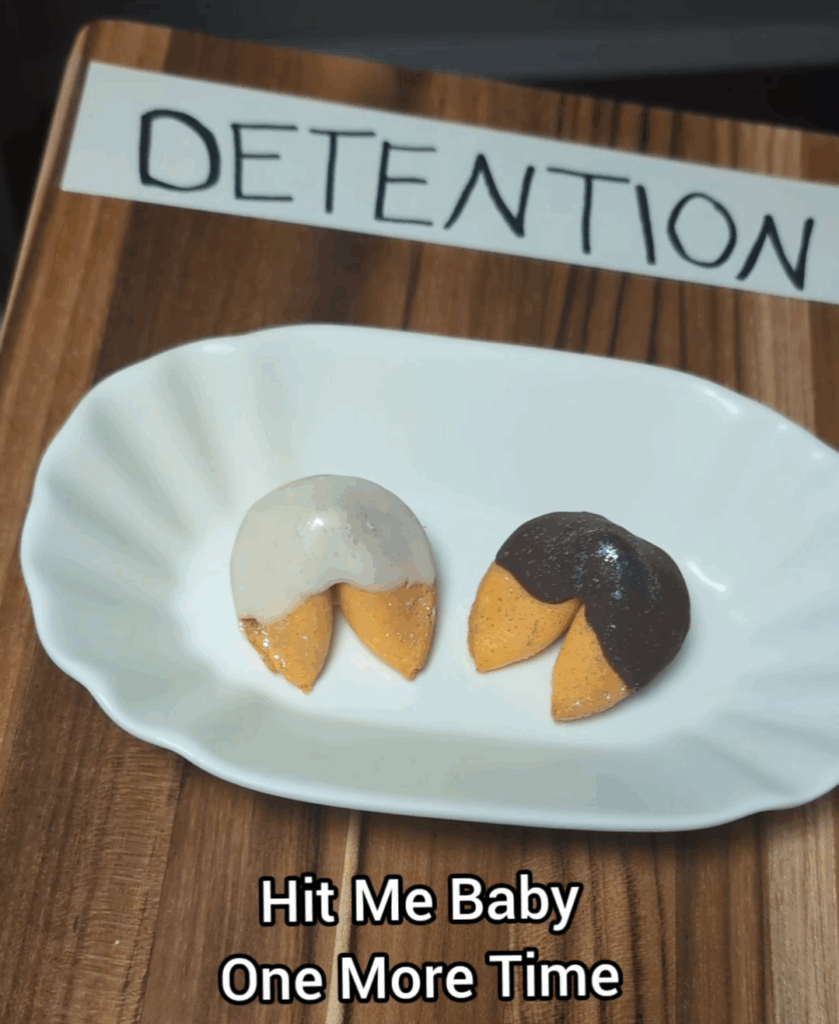
Hit Me Baby One More Time
I had to include the scene where Harry and the grandpa almost get cursed by the fortune cookies, but instead get tackled by the caterer. It makes me cackle every time!
I served “wedding” fortune cookies for this scene. I dipped each cookie in white and dark chocolate to represent the bride and groom, and I also sprinkled edible glitter on top to make them pop a little more.
To melt the chocolate, add ¼ cup of white chocolate and 1 tsp of coconut oil or vegetable oil to a microwave safe bowl. Microwave for 15 seconds and stir well. Repeat this process until the chocolate is completely melted. Dip your fortune cookie into the chocolate and place it on a parchment paper covered tray.
Repeat this process with the dark chocolate. Then place your tray of dipped fortune cookies in the refrigerator for about 30 minutes so they solidify. Once the chocolate is hardened, sprinkle some edible glitter on top and plate your cookies on the serving dish. You can keep these in the refrigerator or on your counter for easy access when its time to serve.