Pirates of the Caribbean
Dead Man’s Chest
Culinary Movie Night Guide
Difficulty Level: Medium


Table of Contents
Equipment
Here is a list (with links) of all the equipment and decorations I used for my Pirates of the Caribbean: Dead Man’s Chest Culinary Movie Night. I would be incredibly grateful if you used my links. I will make a little commission, and that would really help with the cost of the website and related expenses. You can find my full Amazon List here!
Tips
- Personalizing the Menu– When planning your menu for your movie night, don’t feel pressured to serve exactly what I chose to serve. Feel free to remove/add/replace dishes so it makes sense for you and your guests. I’ve included an editable menu in this guide to make it your own!
- Managing Your Time– These movie nights can take a lot of time to prepare, especially if you plan on doing everything yourself. If you are planning a culinary movie night with a group, I suggest doing a potluck style. Have each person contribute a dish or two, and it’ll be very manageable. If you are planning on preparing everything yourself, here are some things I’ve learned while doing these often:
- Make A To-Do List– I can’t stress this enough! It’s very easy to forget simple things like opening a bottle of prosecco before you start the movie, so you aren’t fumbling with the seal before serving. I have done this so many times! Your to-do list should include absolutely everything you need to do leading up to pressing play.
- Start Early– I learned this after a few very long days of trying to cook, prepare, and host all on the same day. Anything that can be done in advance should be done during the days leading up to the movie night. Some examples include pre-mixing cocktails, making desserts and other foods like soup that hold up well in the refrigerator, and pre-making any handmade decorations. Hosting is stressful enough without having to make a multi-course meal in one day, so get as much done as possible before.
- No Pausing– The question I get asked the most is “Do you pause the movie to bring out the next dish?”. It’s important to me that I don’t disrupt the flow of the movie, so I do not pause. It’s also important to me to enjoy the movie with my guests. Setting up everything I need before the movie helps me bring out each dish efficiently. The setup usually includes plating each dish and storing it in the refrigerator, so all I have to do is quickly microwave it before serving. I set out any garnish or decoration on my kitchen counter so it’s easily accessible. I even pour the cocktails into their cups and store them in the refrigerator, so all I have to do is add ice and any finishing touches before serving. Always think about how you can do the bare minimum during the film. I always include the setup in my to-do list as well, so I don’t forget about any aspect of the preparation.
- Optional– If your budget permits, I recommend ordering food that you may not be confident in cooking or food that may take a lot of time to cook. I do this occasionally, and it helps cut down the preparation time and supports local businesses. Win Win!
- Decorations- Have fun and decorate your space and serving tray! Add elements from the theme of the movie, but make a budget and stick to it! I usually use things I already own because these movie nights are DIY, and I don’t need to spend a fortune to make it fun. If I do buy decorations for the movie night, I try to find cheap or reusable things. If you are curious about some of the things I’ve used during the movie nights, here is a link to my Amazon List. All these items are things I bought with my own money and enjoyed using.
- Manage Stress- Culinary Movie Nights are fun and a great way to show your friends and family you love them. Sometimes, things you envision in your head will not come out perfectly. When this happens to me, it can be discouraging and stressful, but the people I do these for have NEVER expressed anything but appreciation. Go easy on yourself and remember that your guests are just happy to be there and to experience something you put so much thought and time into making.
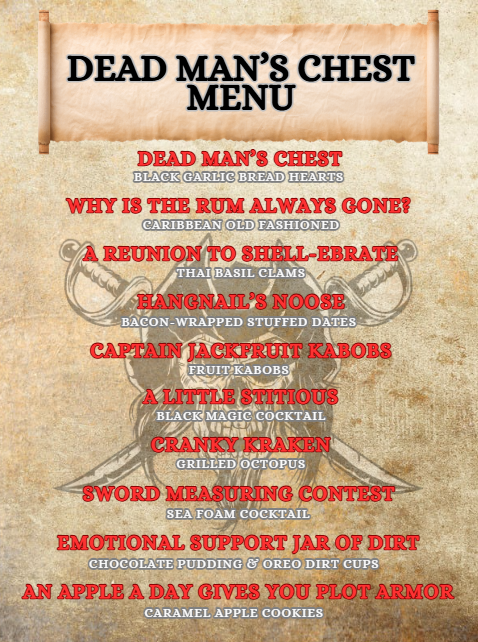
Menu
I have created a free, editable, and printable menu for all the dishes I served for this Culinary Movie Night! Feel free to change it to what will work for you and your guests.
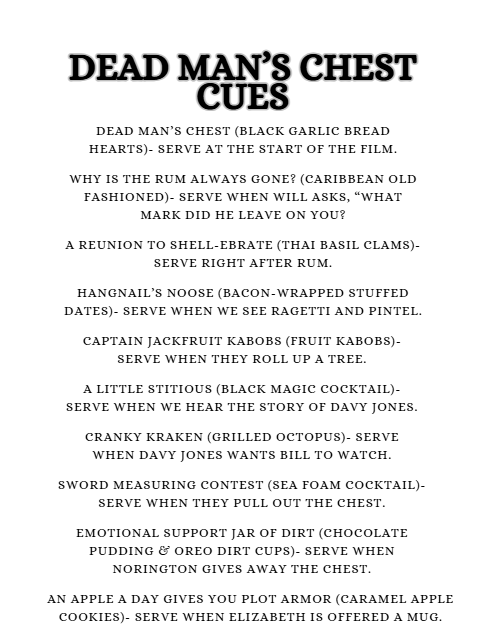
Cues
These are the cues I used during the movie night, so I knew when I had to get the next dish ready to serve.
Please note: Each cue describes a scene that happens a few minutes before I have to serve the dish. It does not describe the scene the dish is based on. Some people get confused about that, so I thought I should specify. Because the cues only give you a few minutes to prepare the dish, it’s very important to have everything cooked and set up before the film starts. Review the “Tips” section above for ways to make this seamless.
I often get asked why I don’t use time stamps to keep track of when to serve the next dish, and the simple answer is, I don’t find those helpful. If I used timestamps, I would have to have a separate timer going or keep disrupting the movie to check the timestamp. It makes much more sense to have cues to indicate when the next scene is about to happen. This allows me to enjoy watching the film with my guests.
Below is the link to the cues I used. This document is editable, so you can make updates if you decide to take out or change dishes.
Recipes
Dead Man’s Chest
To make the black garlic bread hearts I served for the start of the movie, you will need the following:
A can of pizza dough
2 tbsp of salted butter
½ tbsp of chopped black garlic (This is fermented garlic that you can find in most Asian grocery stores. Don’t be scared by the color. It has a delicious, caramelized sweet garlic taste.)
Chopped parsley as garnish
Mozzarella cheese (optional to stuff the bread)
How to make:
Preheat your oven to 350 degrees F. Grease your heart pan so the bread doesn’t stick when it bakes.
Line each heart shape with the pizza dough. If you want to make it a cheesy garlic bread, you can add mozzarella cheese in the center and then cover it up by pinching the pizza dough around it to seal the mozzarella inside.
Bake in the oven for 15-20 minutes, or until the bread becomes golden brown. While the bread is baking, make a garlic butter by melting your salted butter and chopped garlic in the microwave and brushing it on top of the bread when it’s removed from the pan.
Serving tips: This is the first dish to be served during movie night, but the bread can be made in advance to save time. I recommend making just the bread in advance, and then you can reheat it in the oven when you are about to start the film. Add the garlic butter, and parsley right before serving.

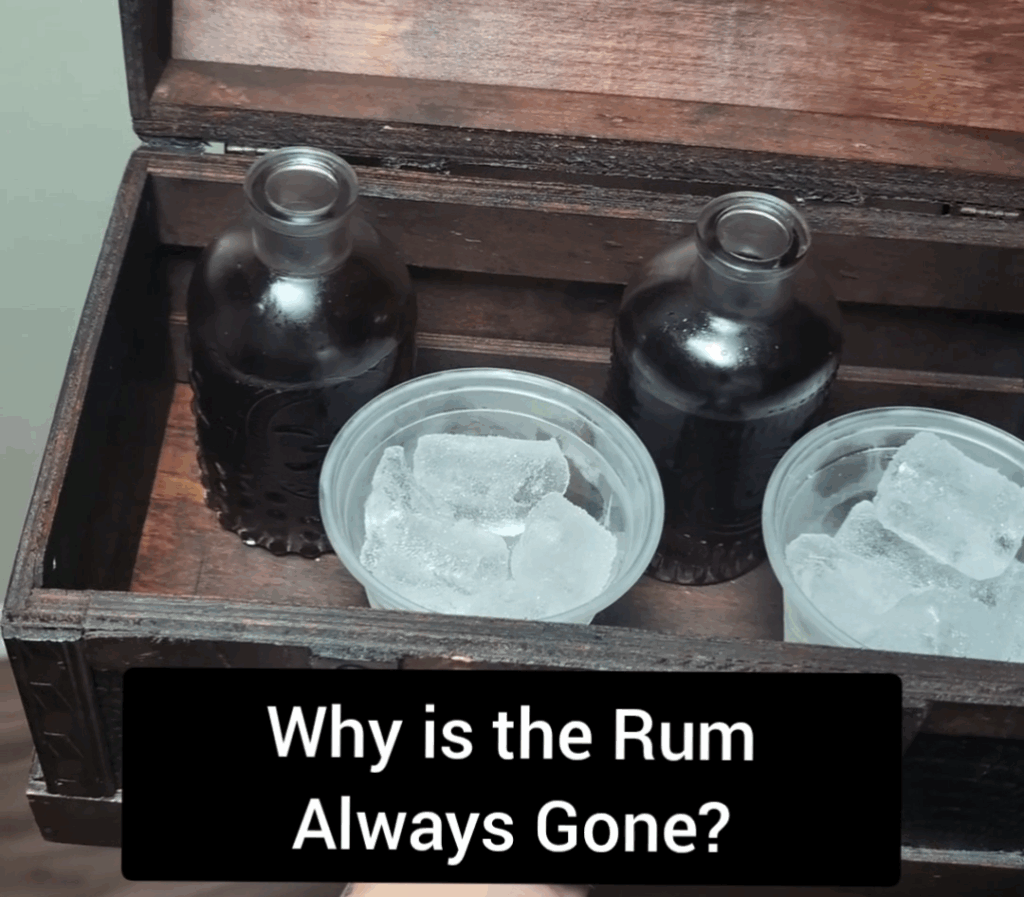
Why is the Rum Always Gone?
Here’s the recipe for the Caribbean Old Fashioned
This recipe has a lot of steps, so if you want a simplified version that is cheaper, I suggest making a regular old-fashioned, but switching the whiskey with Caribbean rum.
To serve this drink, I had it in these bottles to make it feel more on theme, and I served them alongside cups of ice so we could pour it out.
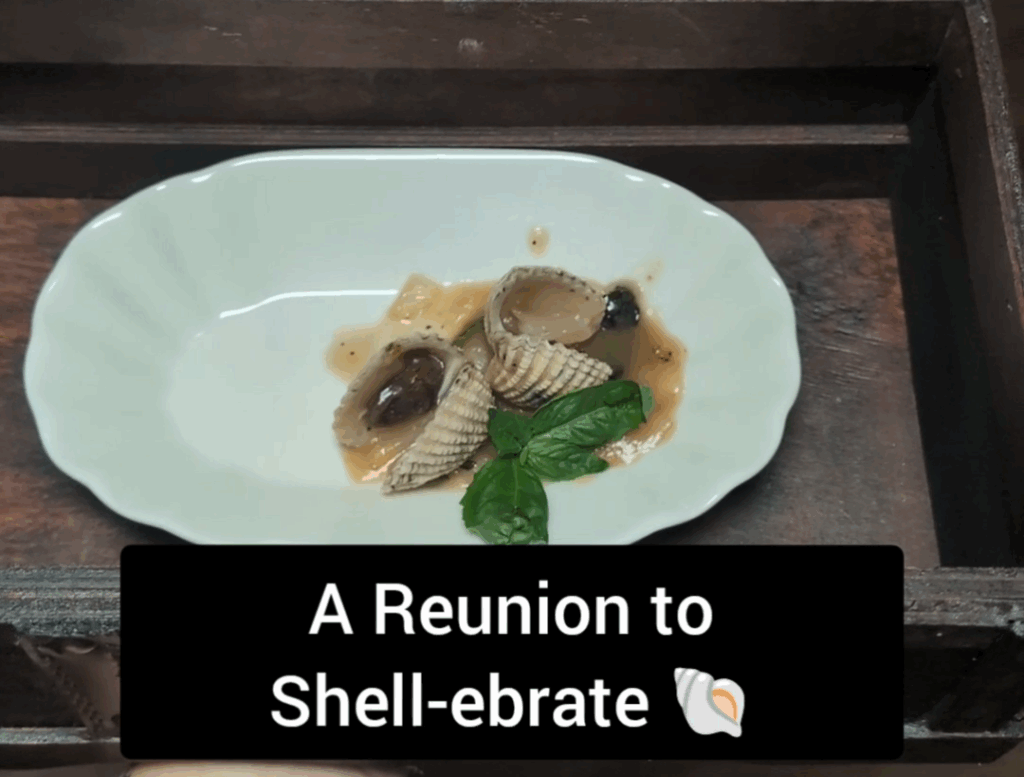
A Reunion to Shell-ebrate
I wanted to serve something with a shell to match the scene where Bill eats one while visiting Jack. I decided Thai Basil Clams sounded good.
When making the clams, if they don’t open while cooking, they are bad, and you have to toss them. Sadly, I only had two open. If I did this over, I think I would buy clams from a restaurant that knows what they are doing. But if you want to try making them at home, here is a recipe you can follow.
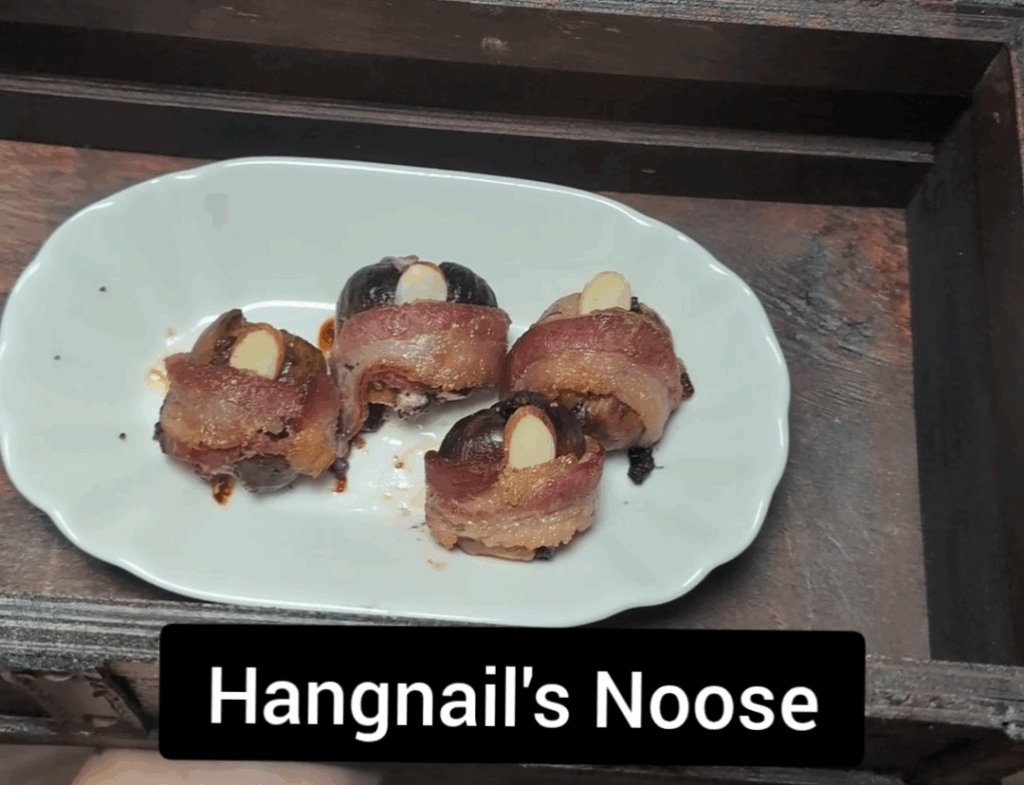
Hangnail’s Noose
The scene where Jack eats the toenail from the toe necklace is one of the most disgusting yet hilariously funny Captain Jack-isms.
I served bacon-wrapped stuffed dates with an almond slice to look like a toenail. To make these “toes”, you’ll need the following:
Dates (pitted)
Bacon
Cheese (I used the blueberry goat cheese from Trader Joe’s, but any cheese could work)
Almond slices (fat ones that look like toe nails)
Honey and salt to drizzle on top
To Make:
Preheat the oven to 350 degrees F. Make a slit on the top of each date and remove the pit if there is one. Stuff the inside with cheese and wrap each stuffed date with bacon. (If your bacon is long, you might need to cut it in half before wrapping).
Bake in the oven for about 15-20 minutes, or until the bacon is fully cooked. Take out of the oven. I recommend plating your wrapped dates and storing them in the refrigerator. Keep the salt, honey, and almonds on your counter so they are easily available.
Serving tip: When it’s time to prepare to serve, microwave the wrapped dates to reheat. Then drizzle honey on top and sprinkle salt. Add the almond slice on top to look like toenails, and serve.
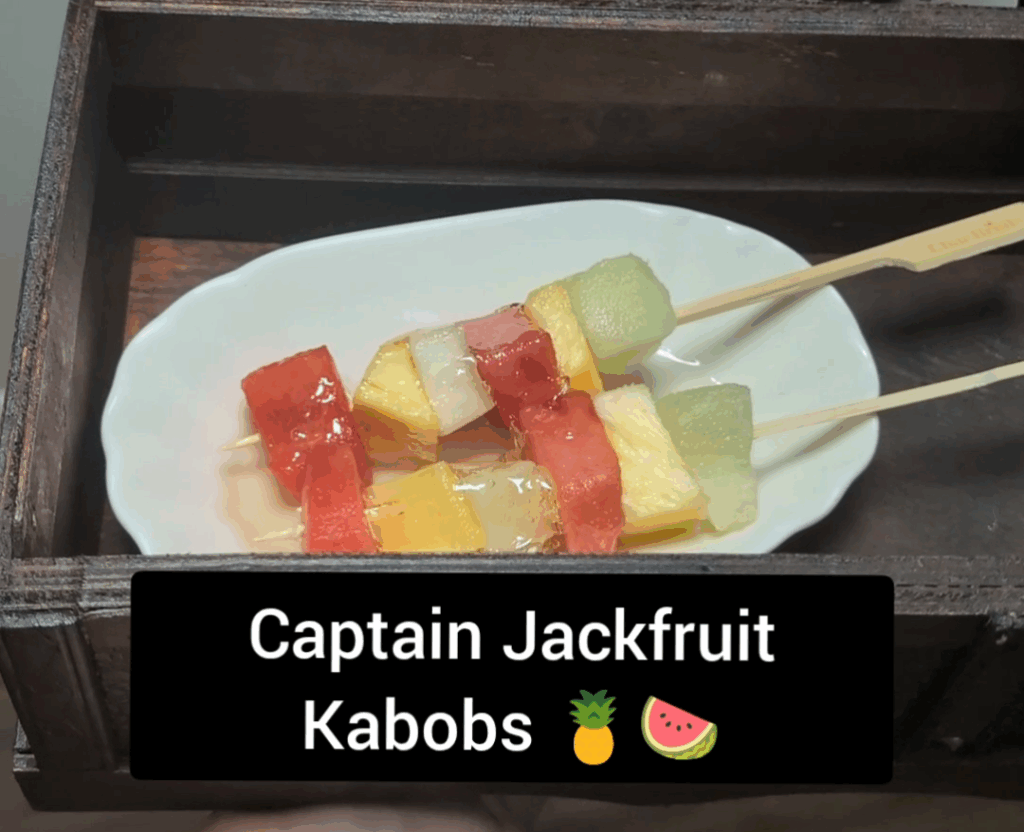
Captain Jackfruit Kabobs
For this dish, I saved time by buying prechopped fruit. I made sure to buy one with pineapple and watermelon to resemble some of the fruit the village was throwing at Jack.
I recommend having the fruit already on the skewer and stored in your refrigerator before you start the film. That way, you can quickly grab the plate and serve.
A Little Stitious
If you watch The Office US, you know! LOL!
Black Magic Cocktail
Ingredients: Makes 1 Cocktail
Lime wedge (to wet the rim)
Either salt or sugar for the rim
2 oz of tequila
1 oz of lime juice
1 oz of triple sec
1 oz of simple syrup
Instructions:
Add the tequila, lime juice, triple sec, simple syrup, and a dash of the edible black glitter to a jar with a lid. Make sure to multiply the ingredients depending on how many drinks you are making. Shake the jar to mix the ingredients and store the jar in the refrigerator until it’s time to serve. I usually premix my cocktails the day before to save time.
To make your black salt or sugar, pour the salt or sugar onto a plate or bowl that is wider than the glass you are using. Pour enough to cover the entire bottom. Add a small dash of the edible black glitter and mix. Add more glitter if you want to deepen the color.
Serving tips: Make sure to have your lime wedge and black salt or sugar on your counter so it’s easily accessible. When it’s time to serve, wet the rim of your glass with the lime wedge and dip the rim in the salt or sugar. Then, add ice and shake your jar of the premixed cocktail before pouring it over the ice.

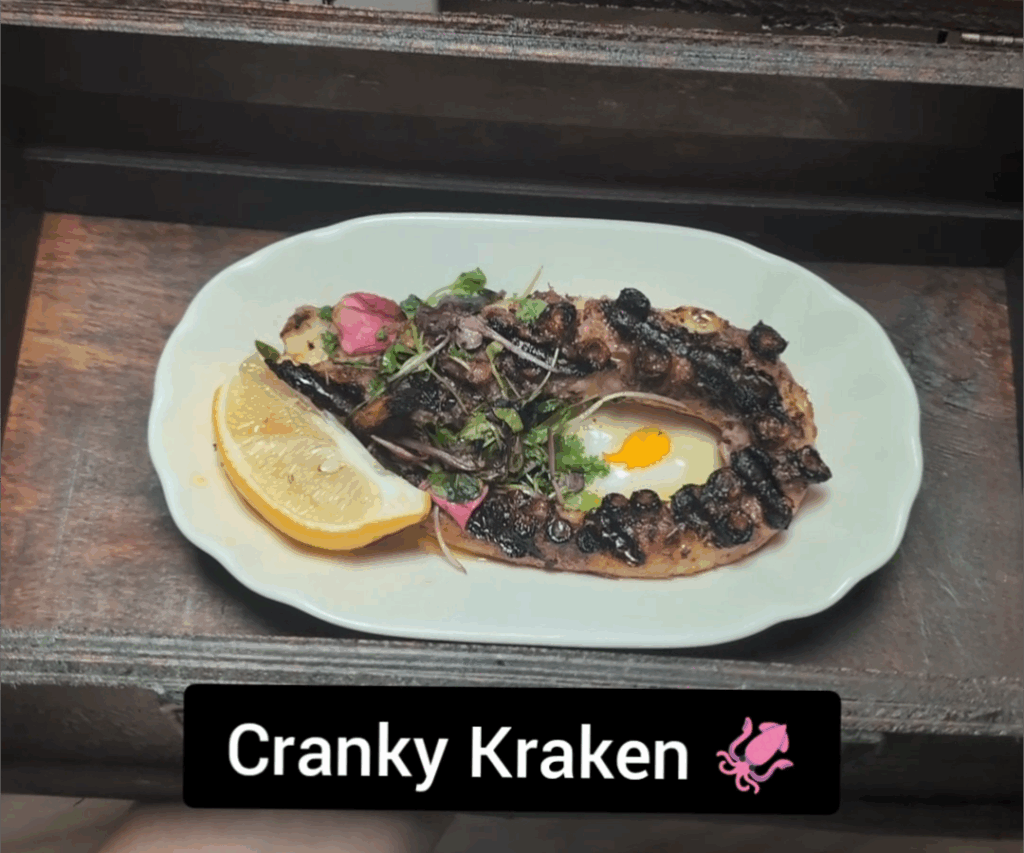
Cranky Kraken
For this scene, I chose to serve grilled octopus to represent the large Kraken tentacles.
I am personally not skilled in making Octopus, so I ordered this dish from a local Peruvian restaurant. Peruvian & Greek cuisine have some of the best seafood, so if you also plan on ordering this dish, I recommend looking up a local restaurant in your area. If you want to cook this dish yourself, I found this recipe that looks great!
Sword Measuring Contest
I named this drink after the funny scene where the men are all too busy fighting because of their hatred, pride, and greed to be aware of their surroundings. I decided to serve a cocktail that looks like sea foam to replicate the beautiful shore this scene takes place on.
Sea Foam Cocktail
Ingredients: Makes 2 Cocktails
¼ cup Coconut Rum
½ cup Pineapple Juice
.5 oz Blue Curacao
1 Egg White (From a pasteurized egg, so it is safe to consume raw)
Pineapple and cherry for the sword cocktail picks
Instructions:
Add your coconut rum, pineapple juice, and blue curacao to a jar with a lid. Shake and store it in your refrigerator. In a separate jar, add your egg white and store it in the refrigerator as well. I usually do all this the day before to save time. If you don’t know what to do with the leftover egg yolk, I usually add it to my scrambled eggs for breakfast, so it doesn’t go to waste.
Before you start the film, I recommend setting up your sword cocktail picks with the pineapple and cherry. Store them in the refrigerator so they stay fresh. I also recommend having your glasses on your counter so they’re easily accessible.
When it’s time to prepare to serve, add your premixed cocktail to the jar with the egg white. The jar should not be too full because it will froth up when it’s shaken. If it’s too full, move the liquid to a different jar before shaking it.
Shake very well to create the foam. After about 30-40 seconds of vigorous shaking, pour your cocktail into the two glasses. Because the cocktail is cold from sitting in the fridge overnight, I do not shake the cocktail with ice. But, if you want it to be super cold, you can shake it with ice and then strain it into your glasses using a fine mesh strainer.

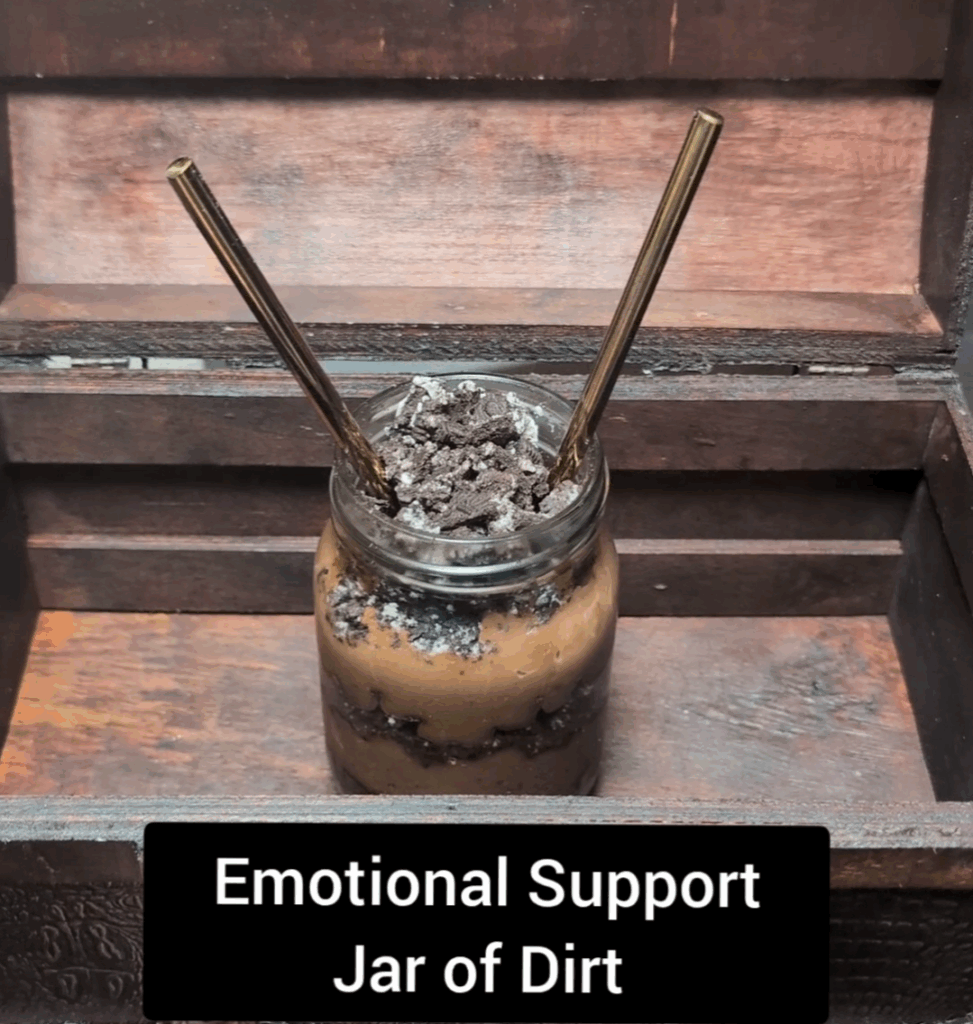
Emotional Support Jar of Dirt
For this dish, all you’ll need is a mason jar, a chocolate pudding packet, and crushed Oreos. I suggest making the chocolate pudding the day before, so it sets in the refrigerator overnight. Follow the instructions on the packaging.
To assemble the “jar of dirt”, add a layer of your cooled pudding in a mason jar, then add a layer of crushed Oreos. Repeat this process until the jar is full. I recommend having the last layer be the crushed Oreos to give it more of a “dirt” look.
Store the jar in the refrigerator until it’s time to serve.
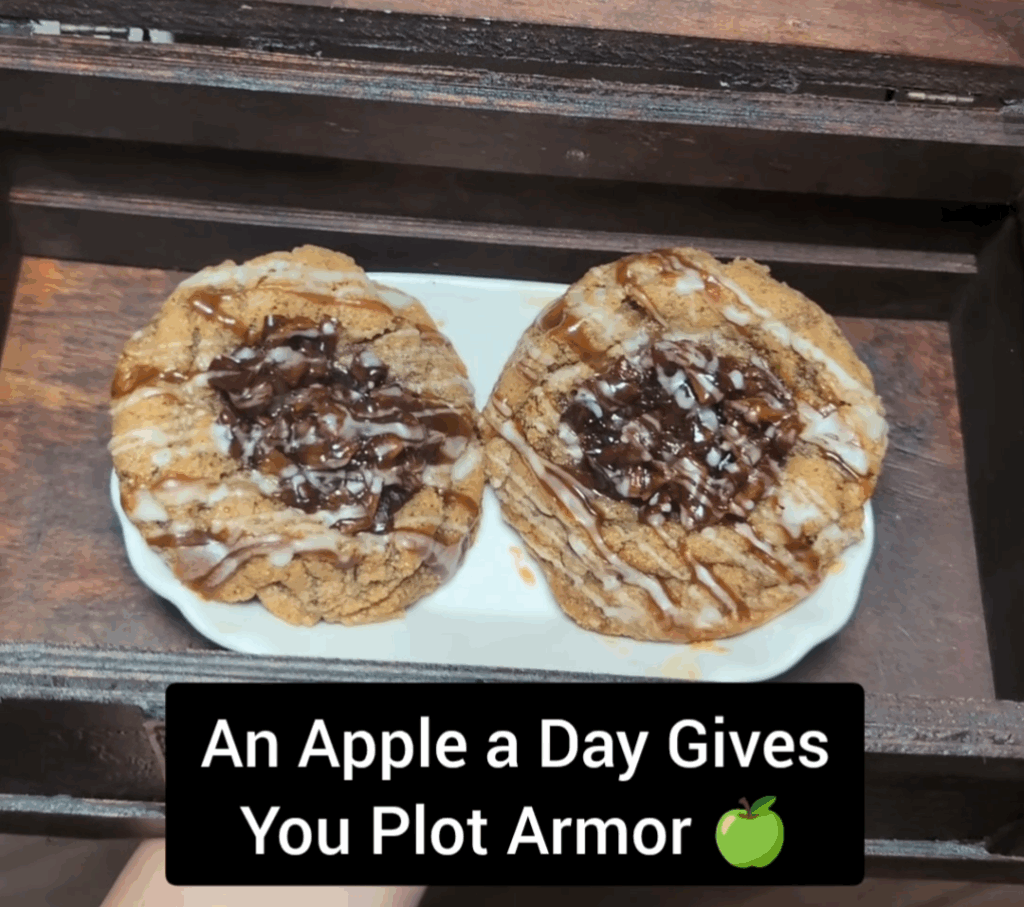
An Apple a Day Gives You Plot Armor
Barbossa is back again! Since this is the last scene of the film, I wanted to serve something sweet. I was in a cookie making phase when I planned this Movie Night, so I made Caramel Apple Cookies!
Here is a video I did showing how to make them!
This is an absolutely delisous cookie but it does have a lot of steps so if you want to serve something a little easier, like apple pie or turnovers, that could work too!
Recipe of Caramel Apple Cookies:
Ingredients:
Cookie Dough:
1/2 cup butter (browned)
3/4 cup brown sugar
2 tablespoons white sugar
1 egg
3/4 tablespoon of vanilla extract
1 cup of flour
2 teaspoons Cinnamon powder
3/4 teaspoon baking soda
1 teaspoon salt
Caramel Apple Filling:
1 apple- Peeled and diced
1/2 cup brown sugar
2 teaspoons of cinnamon powder
1/2 teaspoon nutmeg
1 tablespoon lemon juice
1/4 cup butter
Pinch of salt
Cornstarch mixture:
1 tablespoon of cornstarch
1/2 tablespoon of water
Icing:
1/4 cup confectioners’ sugar
3/4 tablespoon milk
Instructions:
- In a small saucepan, add your butter and heat on medium heat until it turns a golden brown. Usually takes about 5-10 minutes, depending on the heat level. Stir often and watch to make sure it doesn’t burn. Remove from heat immediately after it turns golden and starts smelling fragrant to avoid overcooking.
- In a large bowl, add the brown sugar, white sugar, and browned butter. Mix and then add the egg and vanilla extract. Mix just enough to break up the egg. Then add the flour, cinnamon powder, baking soda, and salt. Mix thoroughly.
- Roll your dough into round dough balls. Makes approximately 6-8, depending on the size. Freeze them while you prepare the caramel apple filling.
- Peel and dice your apple and place it in a small saucepan. You can use the same one from the browned butter. Add the brown sugar, cinnamon powder, nutmeg, lemon juice, butter, and salt. Mix and cook on medium heat. Mix often.
- Once the butter is melted and the apples have softened (takes about 5-10 minutes), mix the cornstarch and water in a small bowl and then add it to the apple mixture. Turn up the heat to medium high and constantly stir. The added heat and cornstarch mixture will quickly thicken the caramel apple mixture. After about 5 minutes, your mixture should be thicker. Remove it from the heat. This mixture is high in sugar so it will overcook very quickly.
- Preheat your oven to 350° F. Arrange your frozen cookies evenly apart on a baking sheet lined with parchment paper. Don’t overcrowd them. Bake for 10 minutes and then remove from the oven and press down the center of the cookies with a spoon.
- Fill the center with the caramel apple filling and place back in the oven for an additional 6-8 minutes or until the edges are slightly darker than the rest of the cookies. (Note: you can cook the cookies fully for 16-18 minutes and then add the filling after for less mess, but I prefer to add it halfway through the cooking process because it incorporates with the cookie dough and makes the most delicious ooey gooey combination).
- If you want the perfect round shape, use the cup trick right after baking when the cookie is still warm and you’re able to mold its shape.
- While the cookies cool, make your icing by mixing together the confectioners’ sugar and milk. For the caramel drizzle, you can use pre-bought caramel sauce, or you can use the leftover caramel sauce from the apple filling. That’s what I did.
- When the cookies are cooked after 10 minutes, drizzle each cookie with the icing and the caramel sauce.